Practice 2: Major Study Planning (MS 1)

Practice 2

Main Idea

I’ve been thinking about my final semester project essentially since I was accepted onto the course, so I have a fairly fleshed-out idea in my head of what it will entail. In short, I’m going to be sculpting the Dungeons and Dragons character that I’ve invented and established. She’s a grandmotherly necromancer woman who spends her time babying her skeleton familiars and occasionally grave-robbing corpses for additional trinkets to add to her collection. Her idyllic cottage in the woods seems seems welcoming and non-threatening until you look a little closer, where you’ll notice nods to her darker hobbies.

I plan to sculpt two characters: the necromancer herself and a partially-decayed skeleton companion. The woman will be standing near her minion and interacting with him in an affectionate way, perhaps patching a wound or sewing up his clothing. As characters are the focus, I will only be making a small vignette of the environment (her front door and a portion of her doorstep with a patch of ground). This will allow me to focus on creating every element of both characters in a highly detailed, fairly realistic style, with particular care taken towards complex garment and accessory sculpting. In terms of time management, I’m trying to make this project as modular as possible (i.e. have ‘wishlist’ items like additional pieces of the environment, more jewelry and bits on her outfit, etc.) so that there are no issues if I need to drop extra elements.

I’ve been generally taking bullet-point notes for myself whenever I thought of new ideas for this project, which I’ve pasted below to document its evolution.

Necromancer

  • Figure (necromancer character) standing near the doorway of a semi-stylized stone-and-moss cottage, with loads of flowers and plants
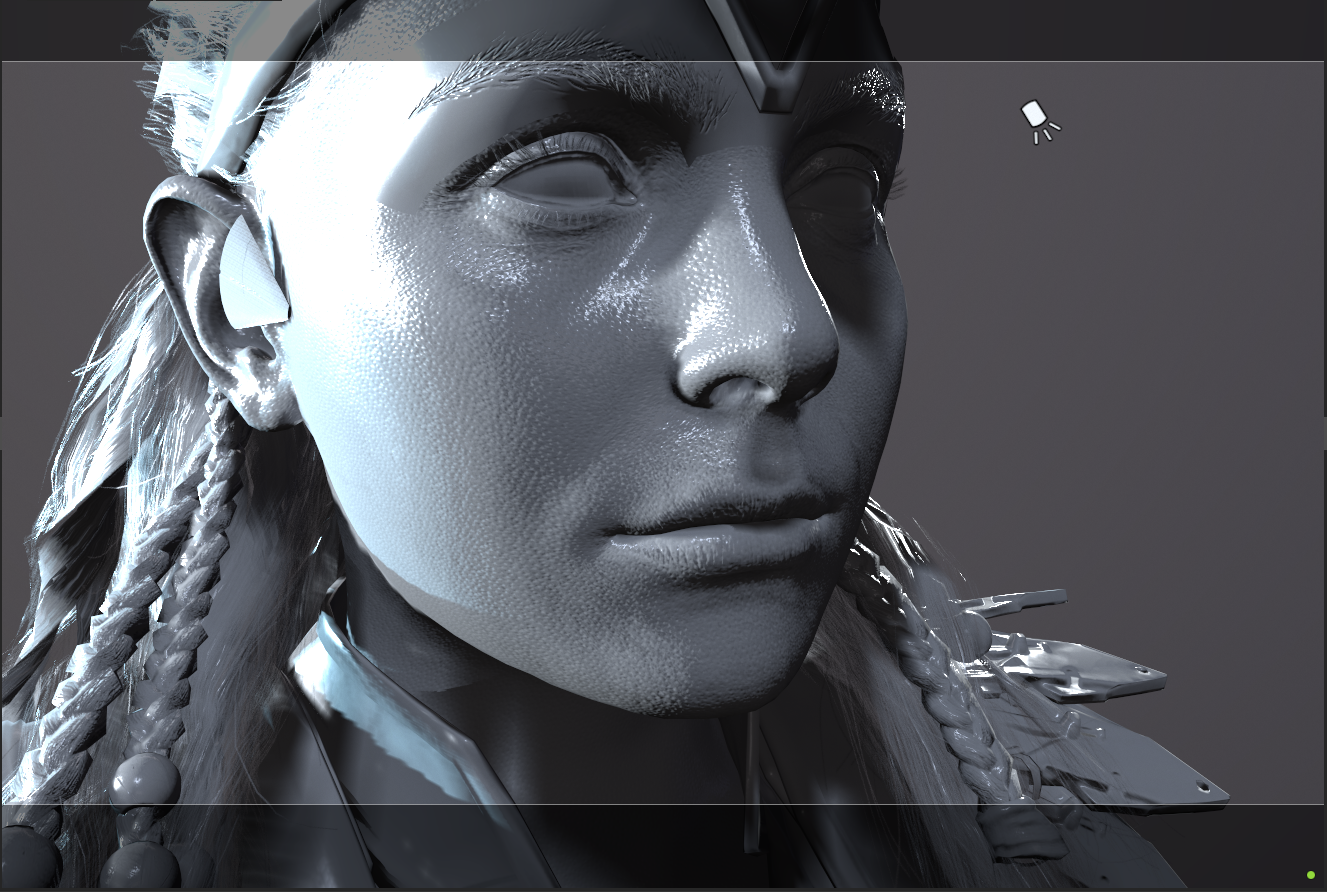
  • Can design + sculpt woman in her entirety, including pose, hair, clothing, etc.
  • Pose ideas: woman tending to injured undead minion, putting some sort of band-aid situation on a bony knee or reaching up to a forehead or sitting with its head in her lap
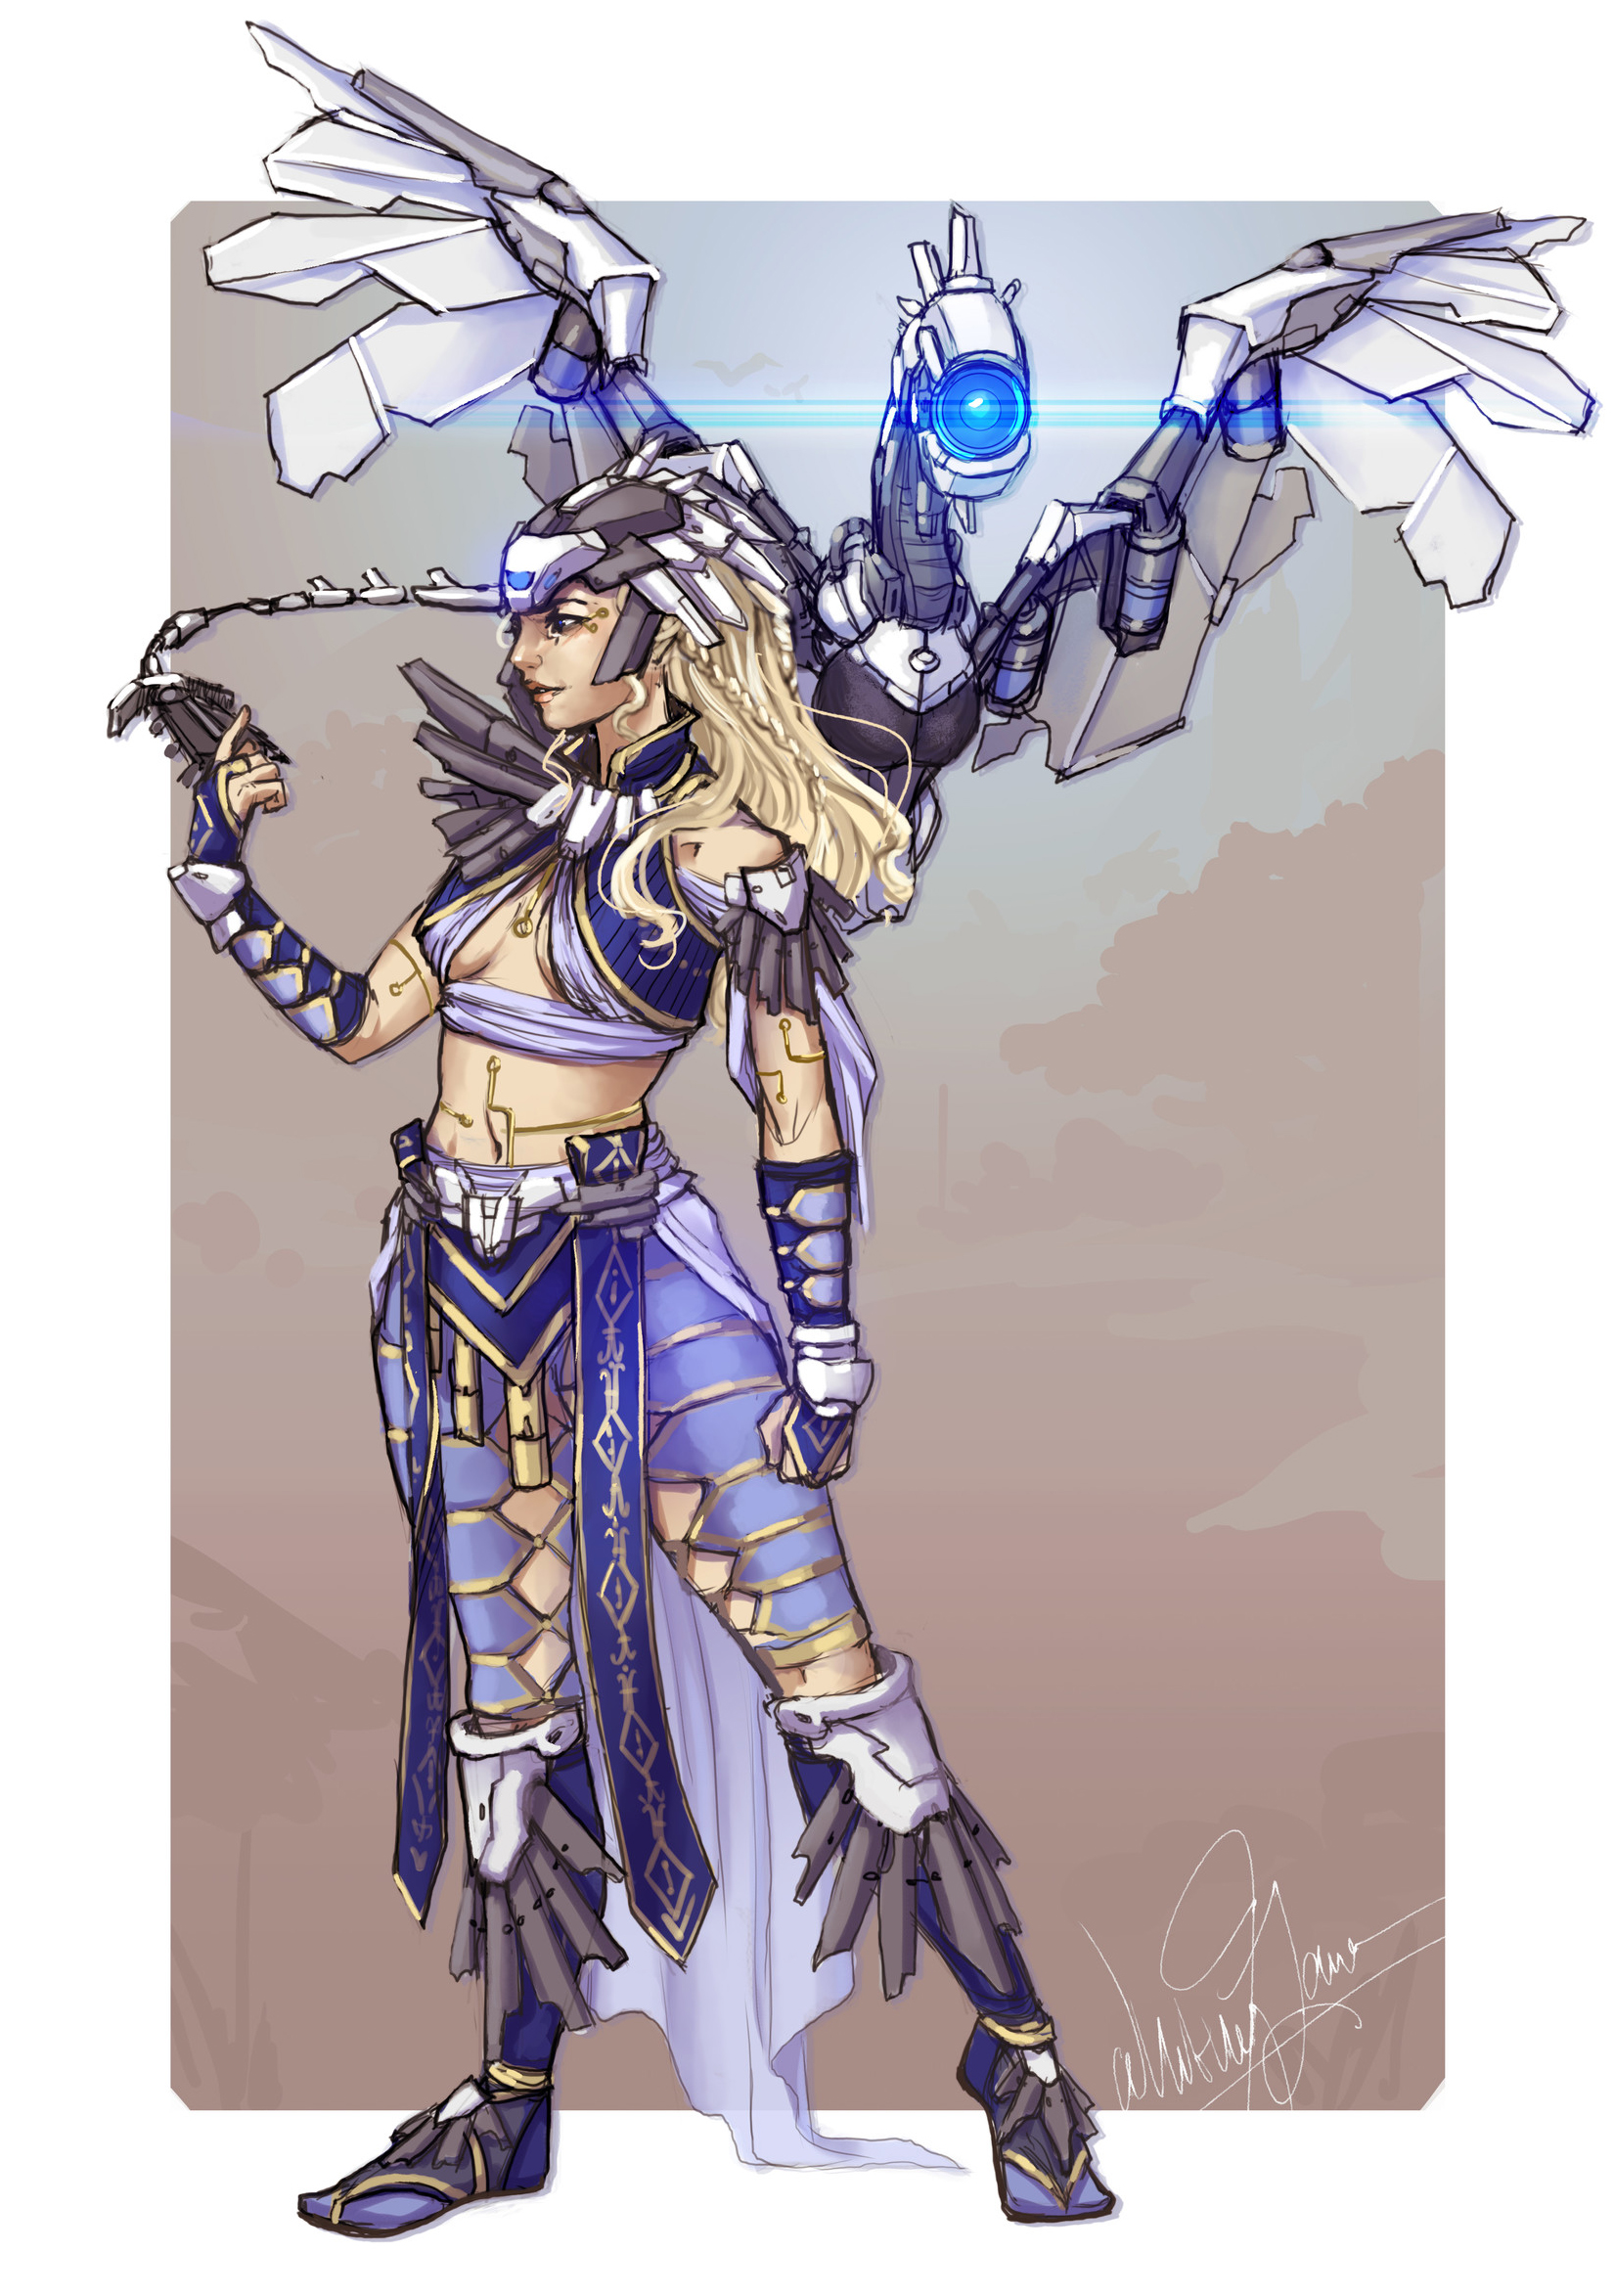
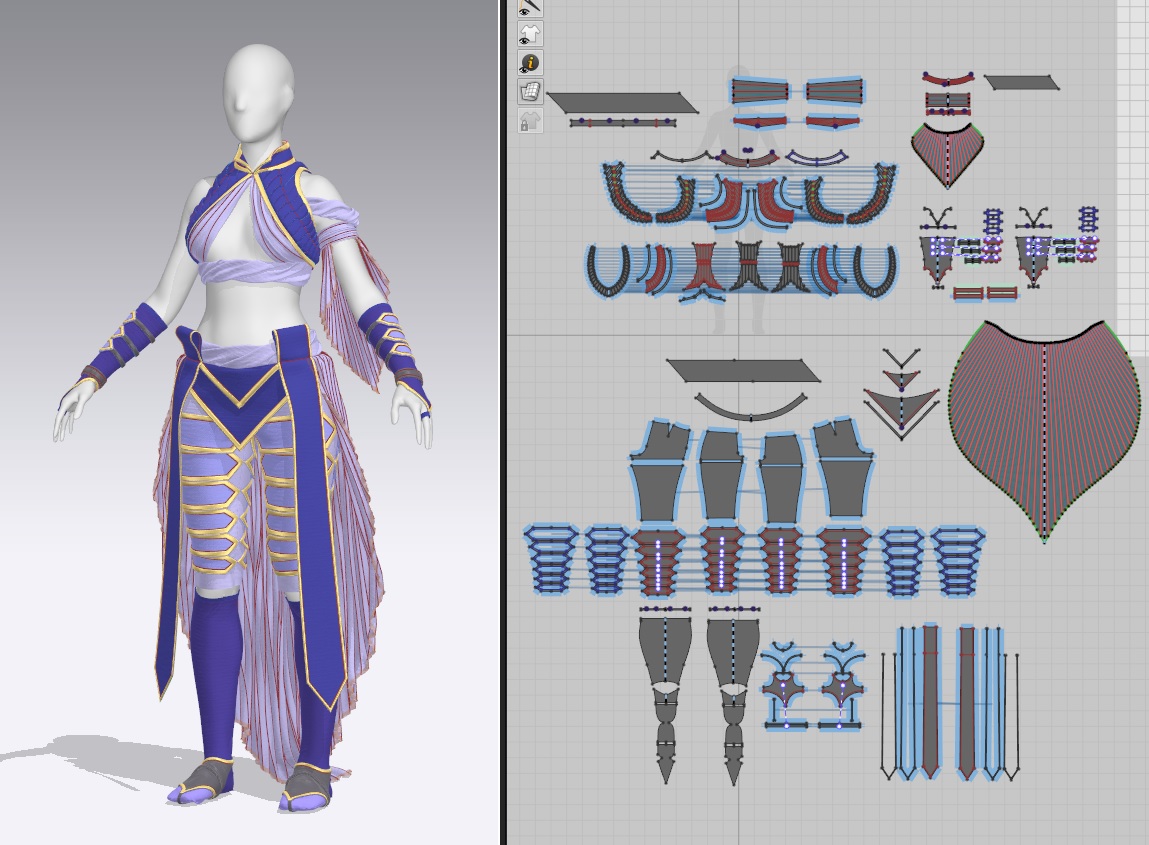
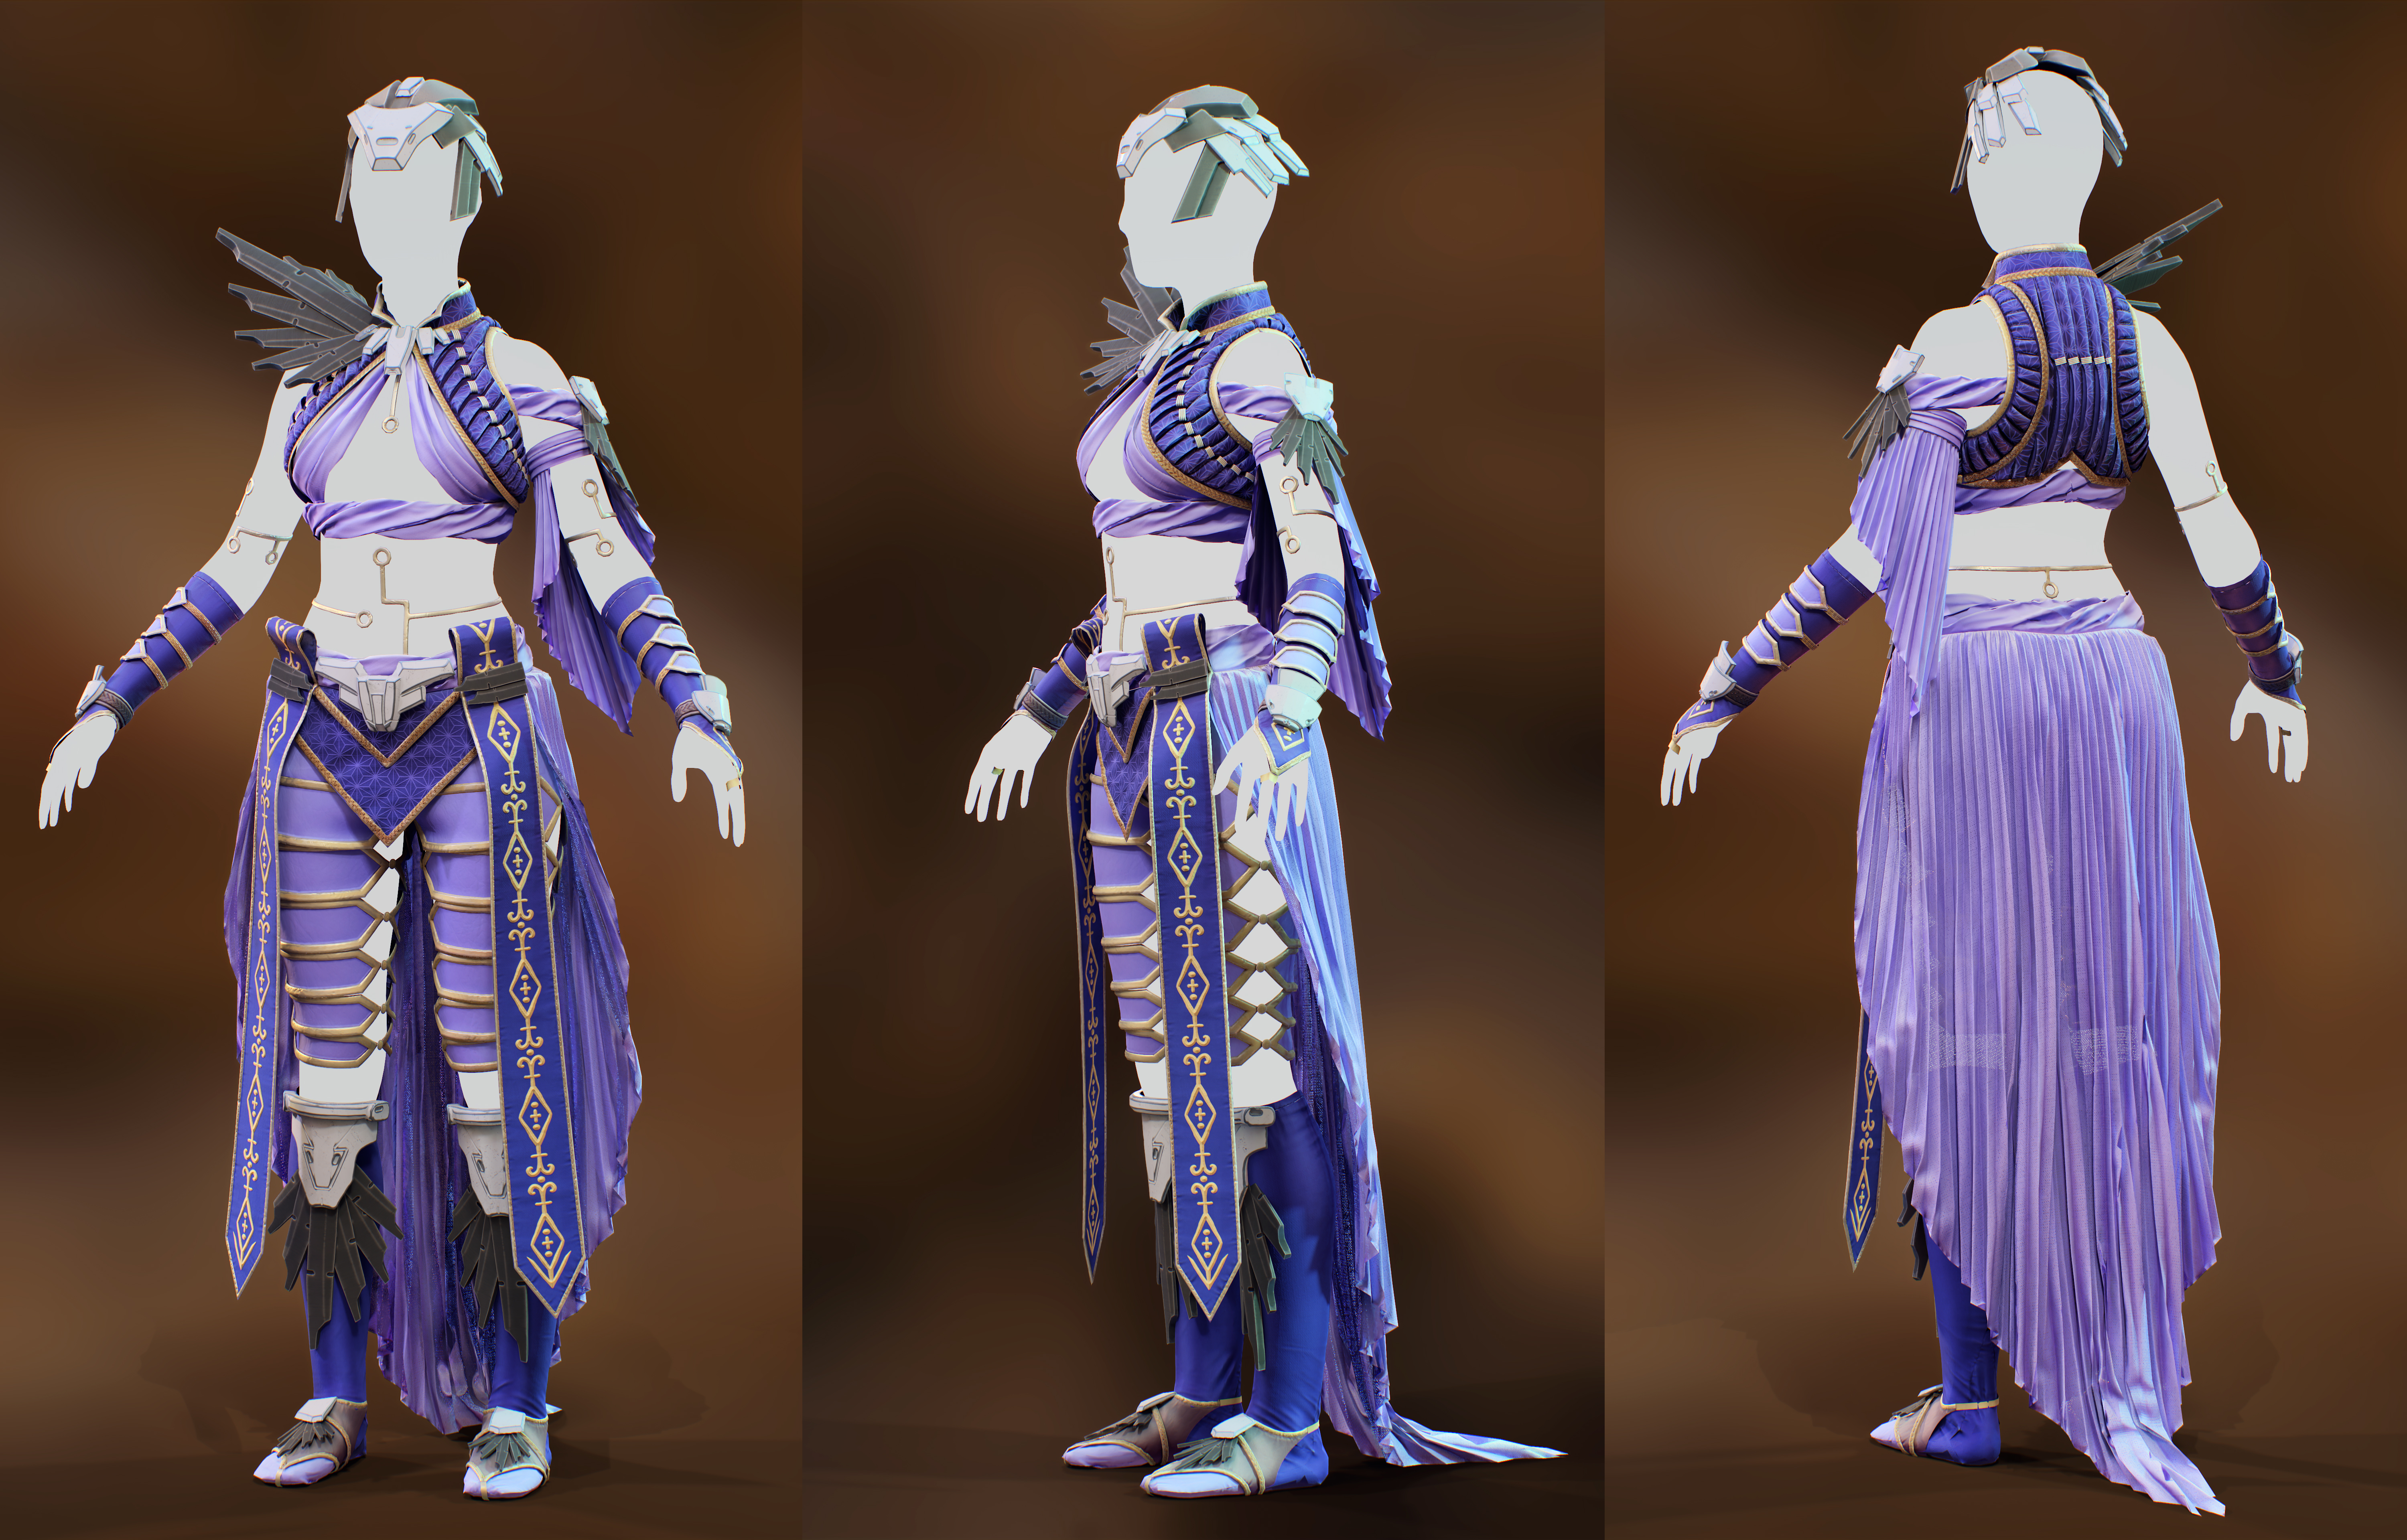
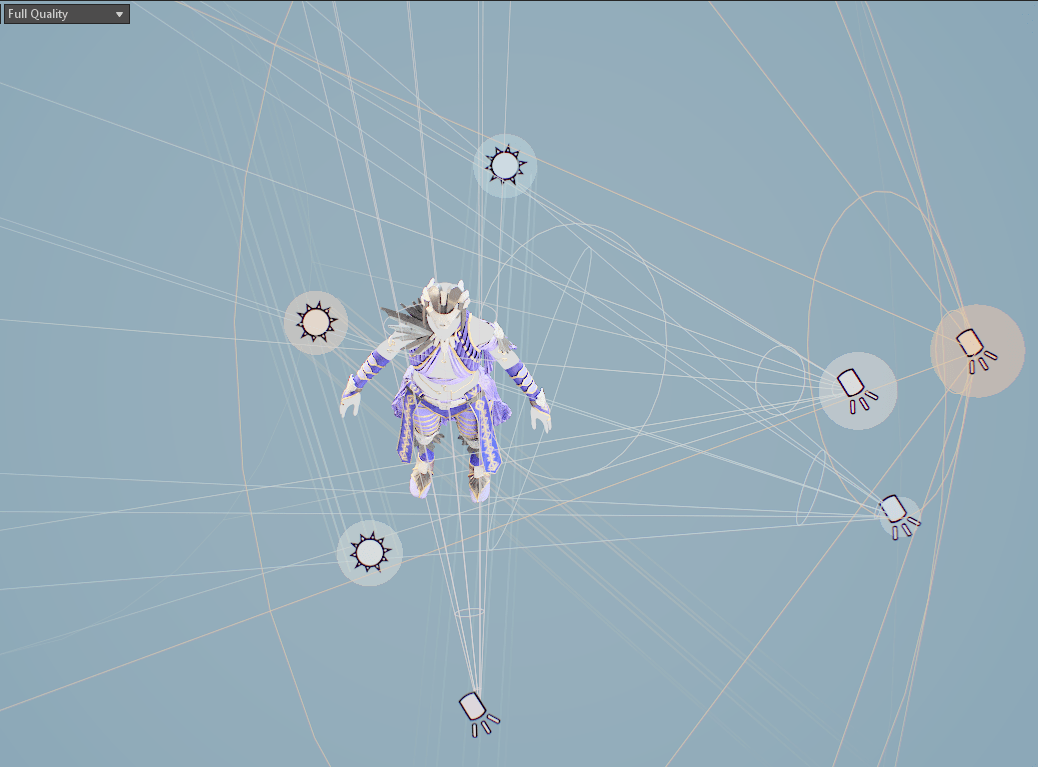
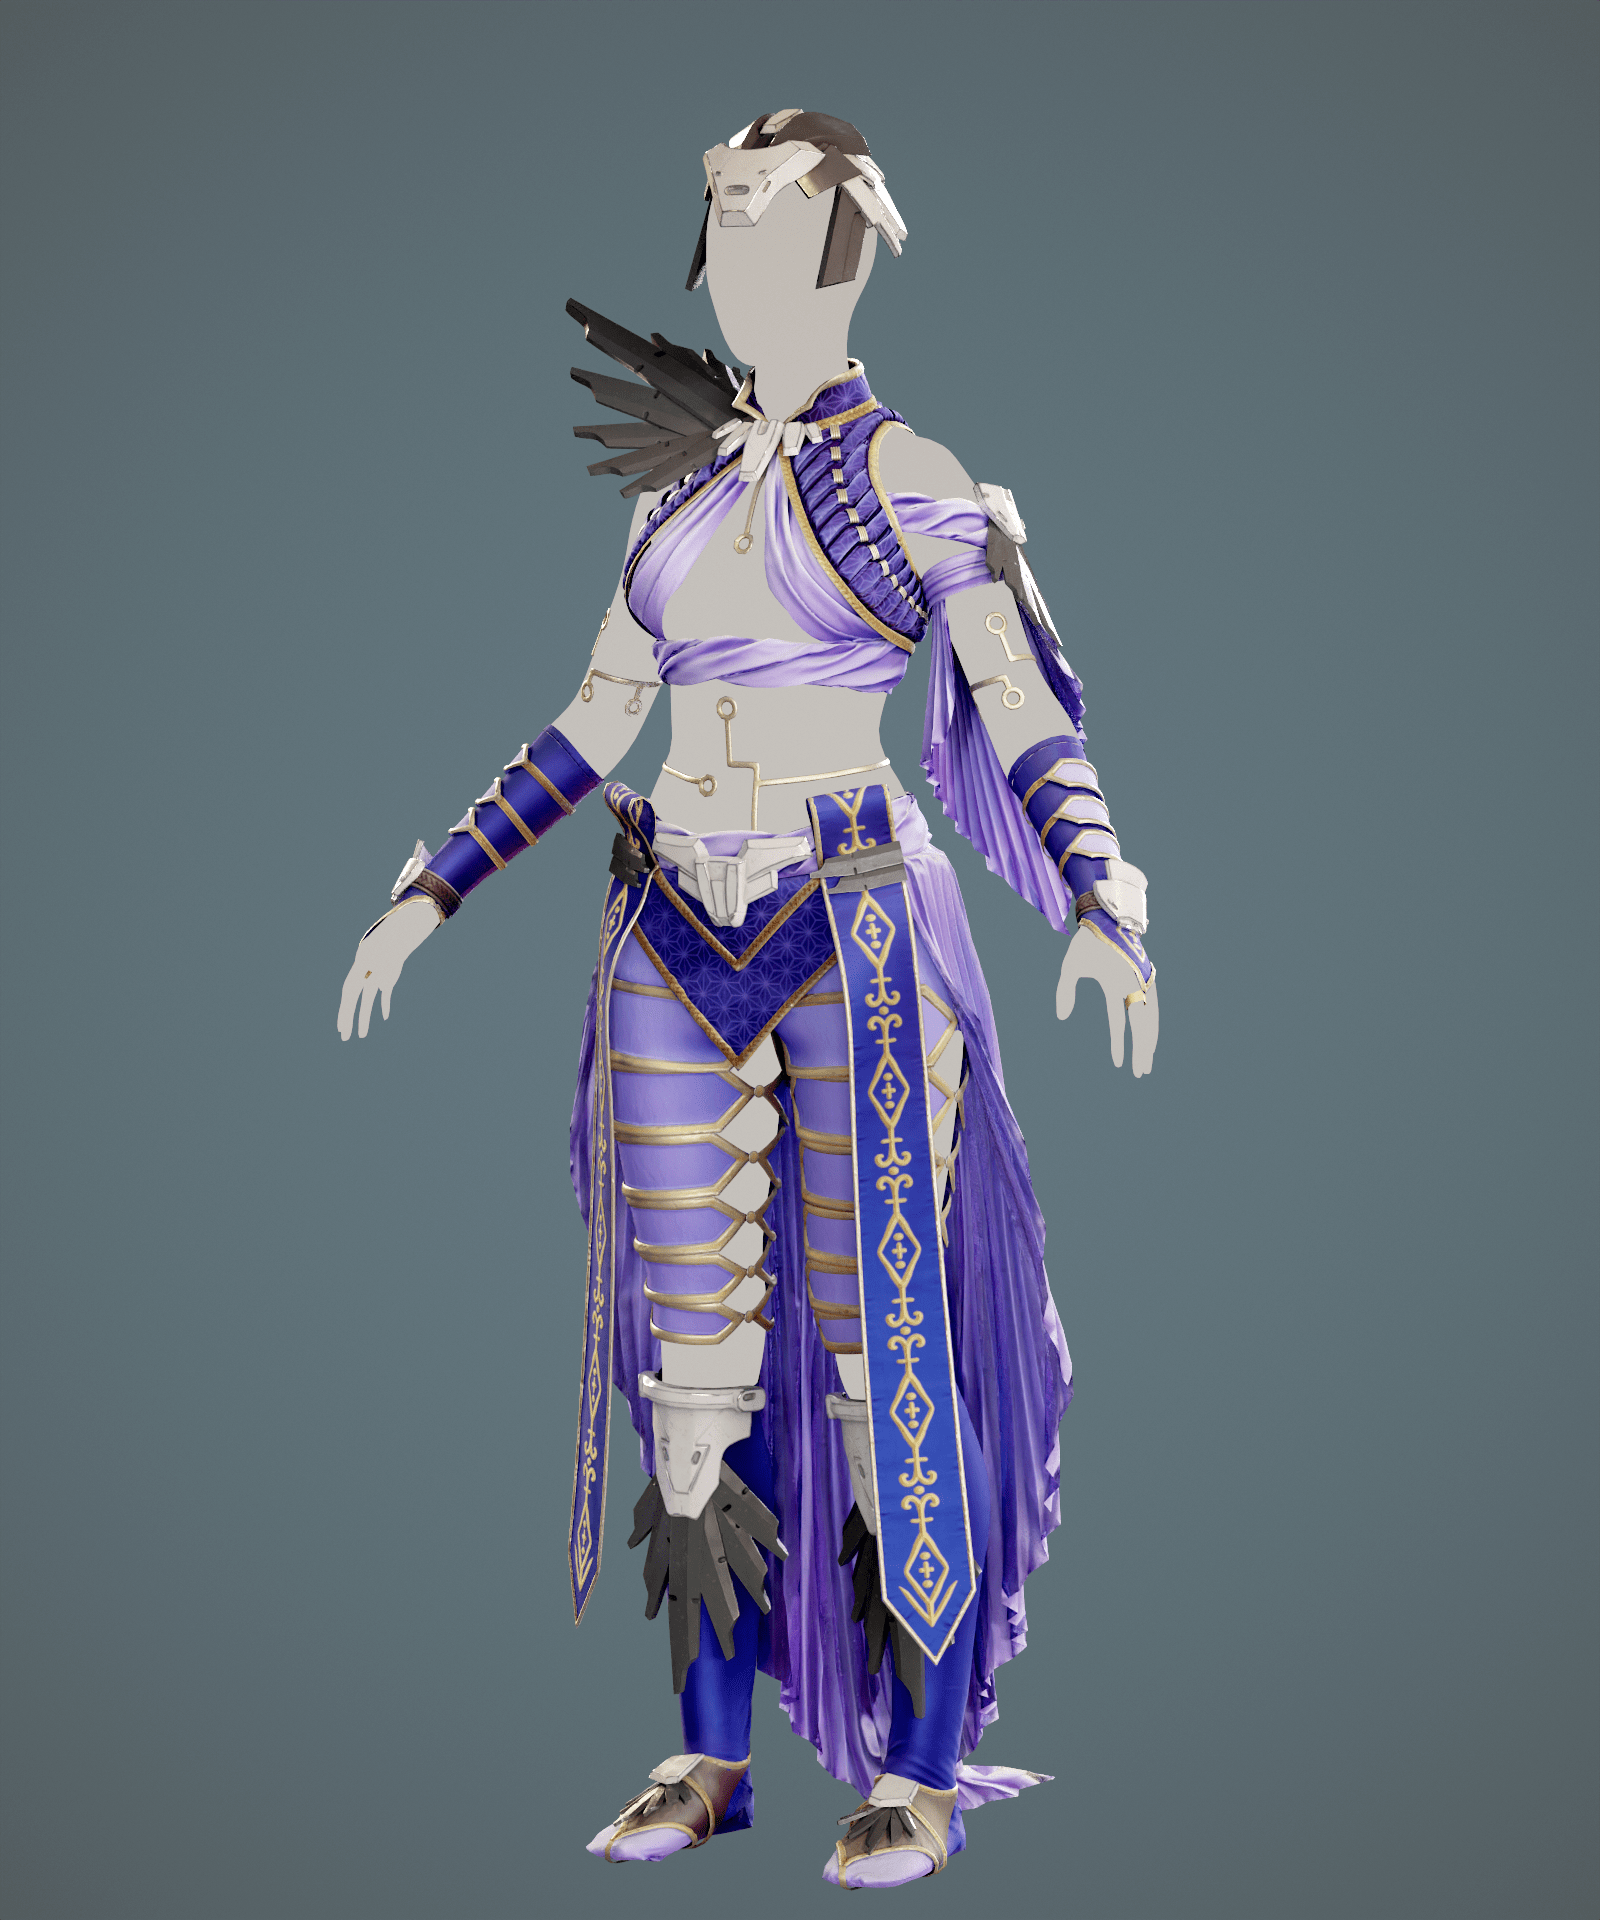
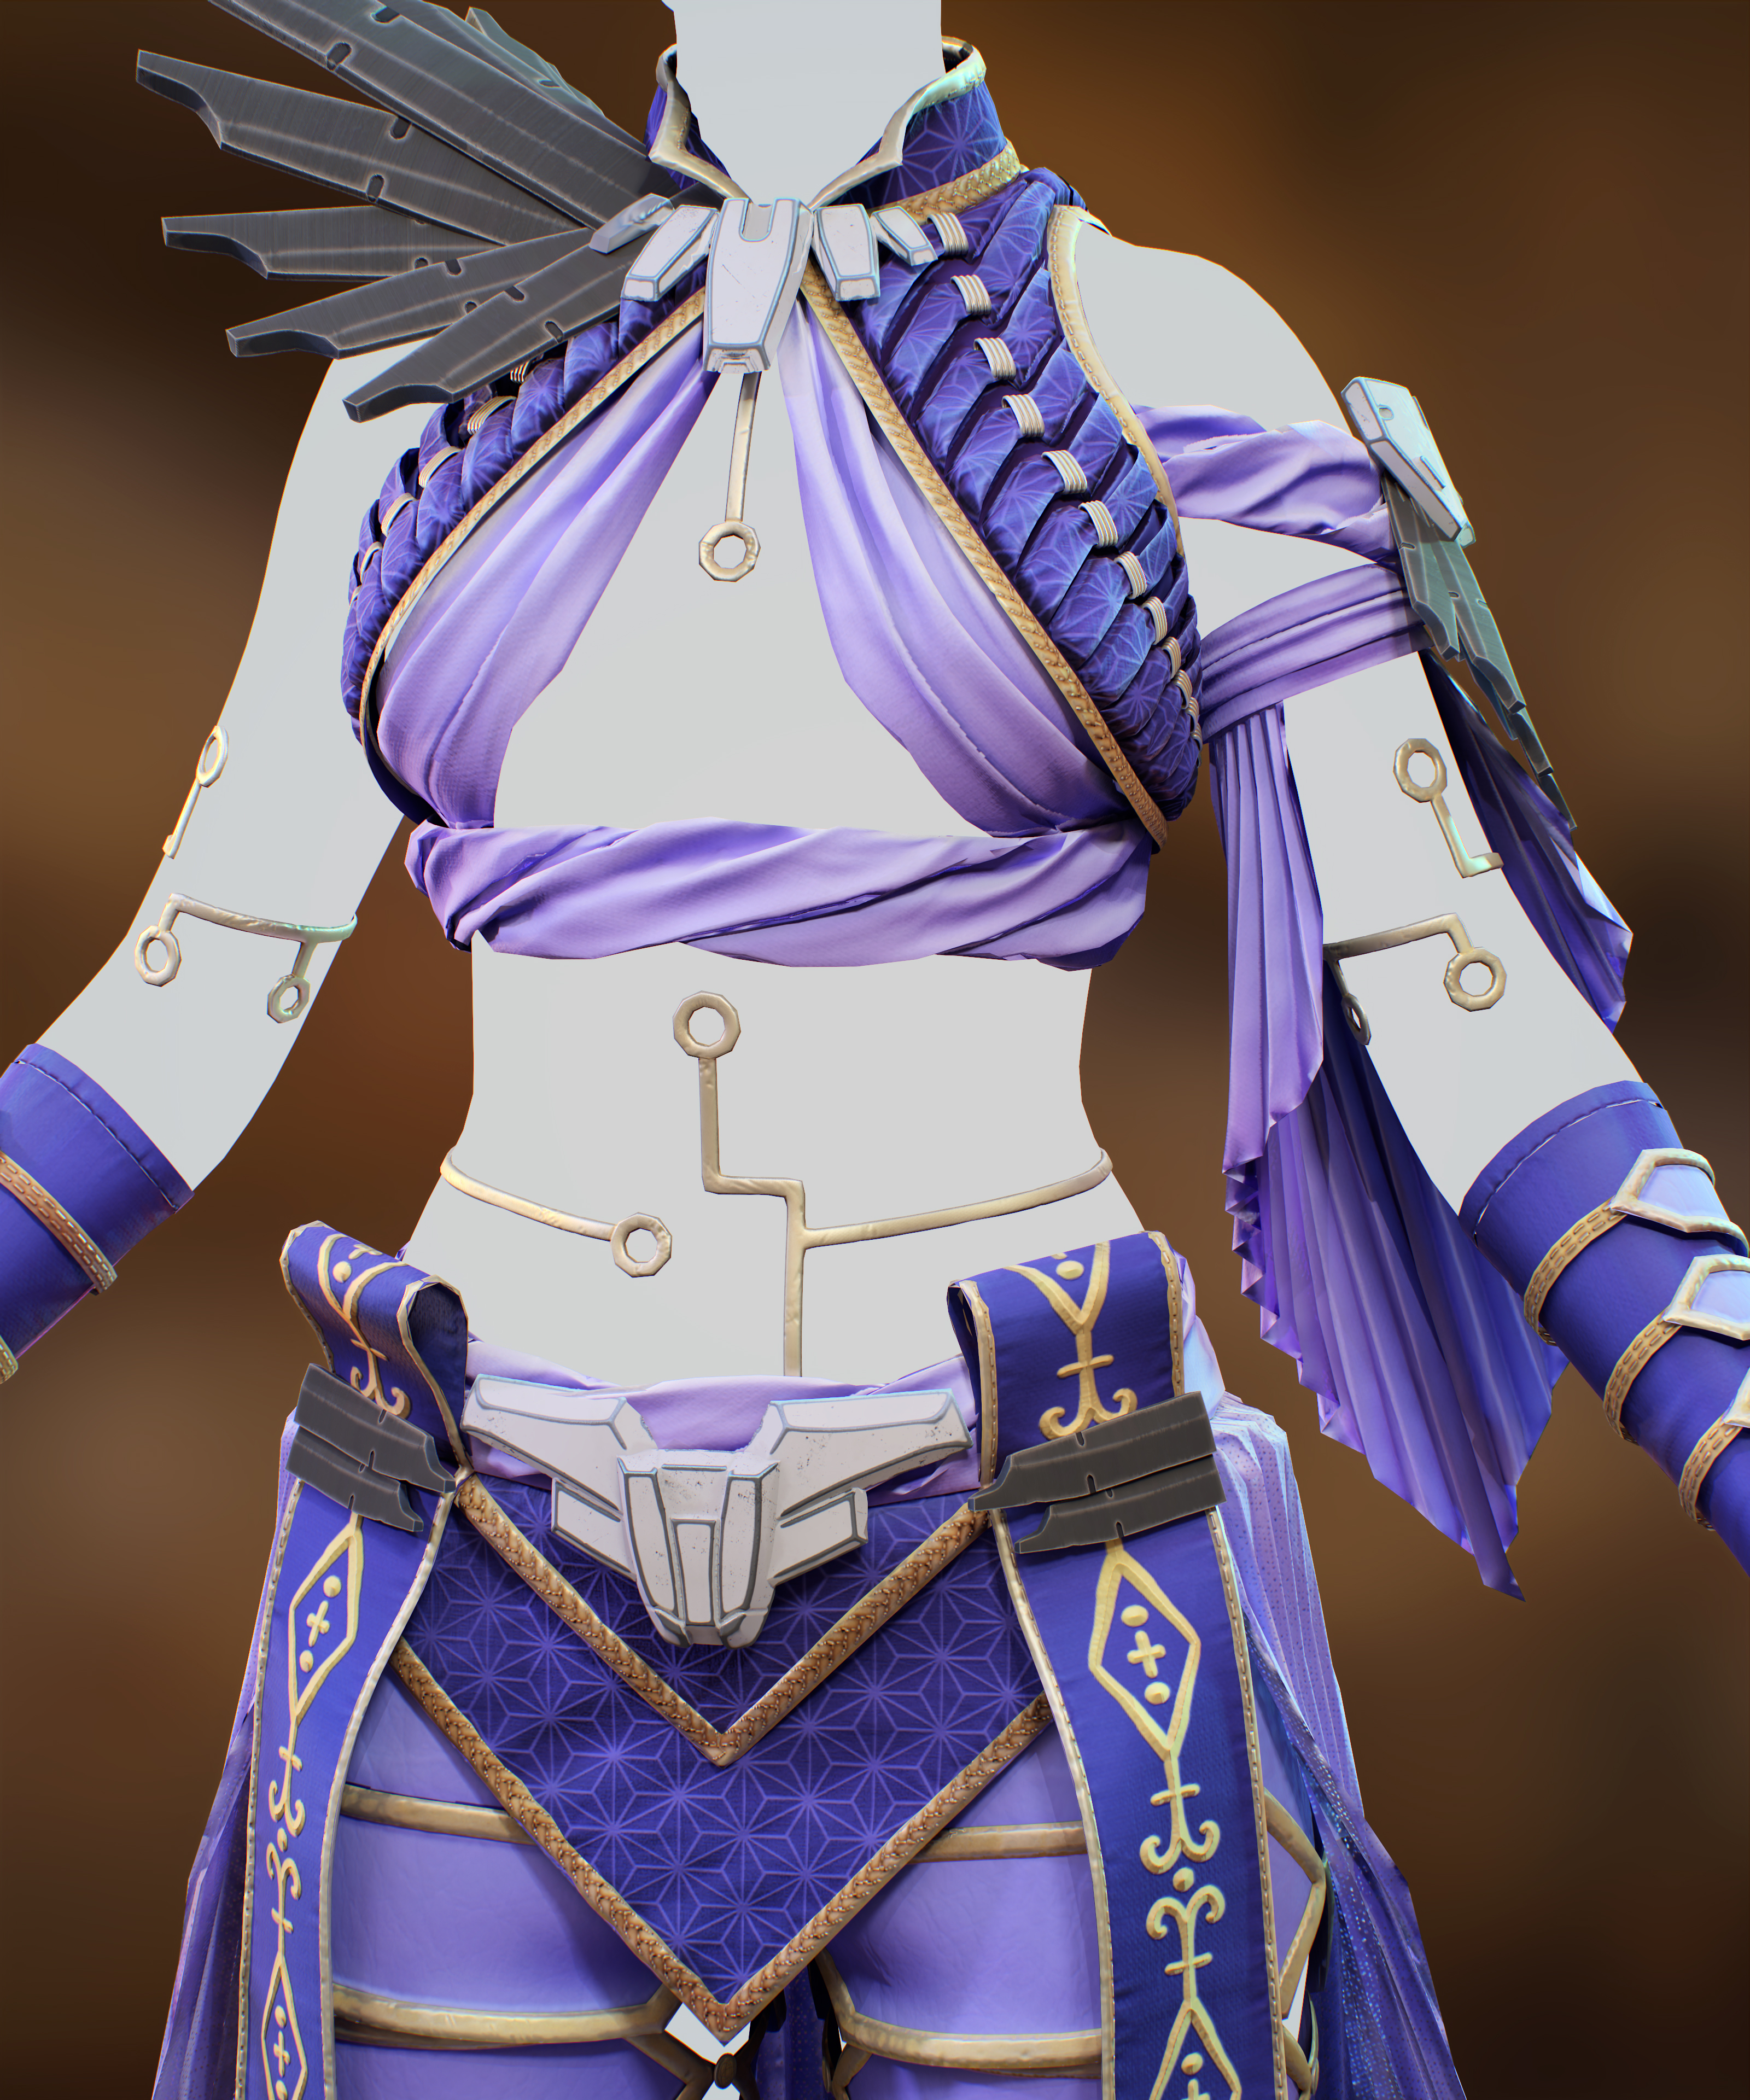
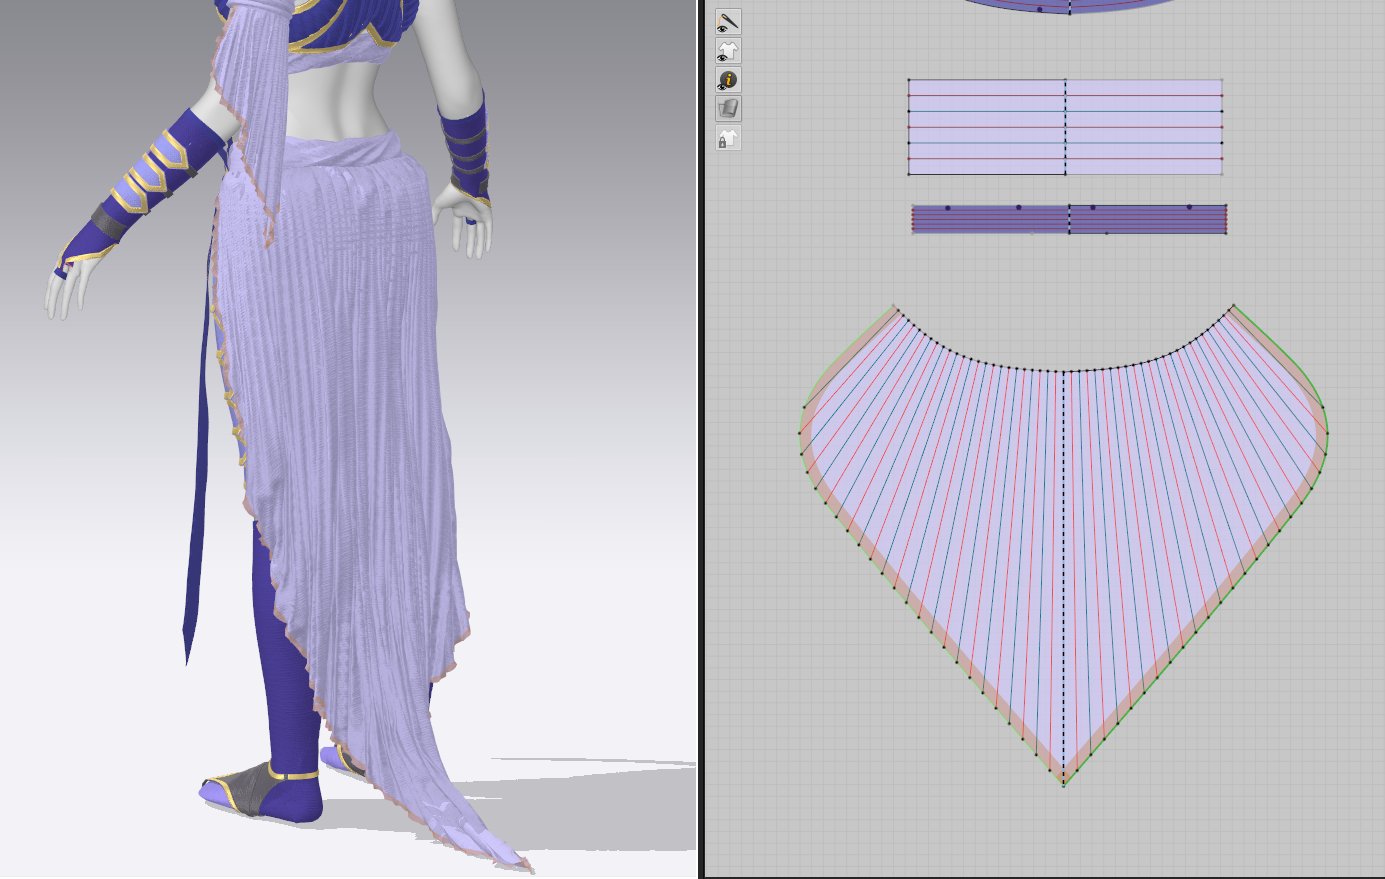
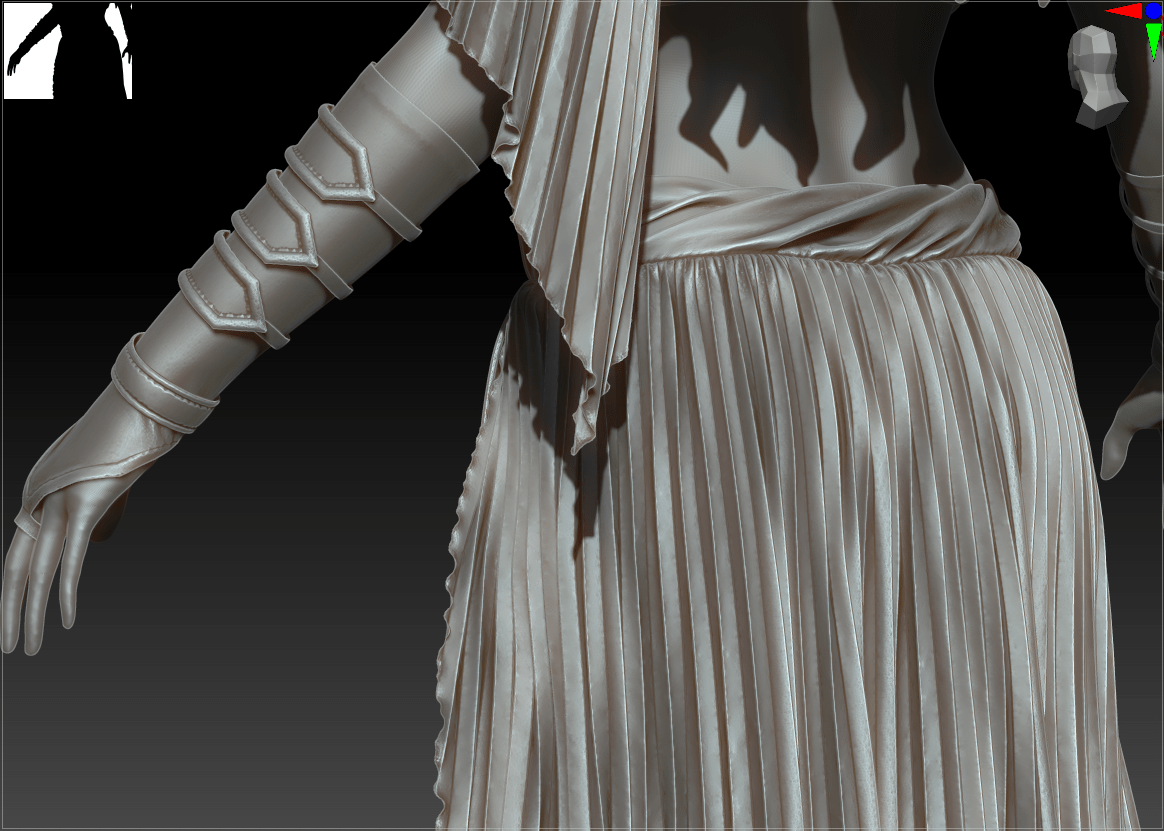
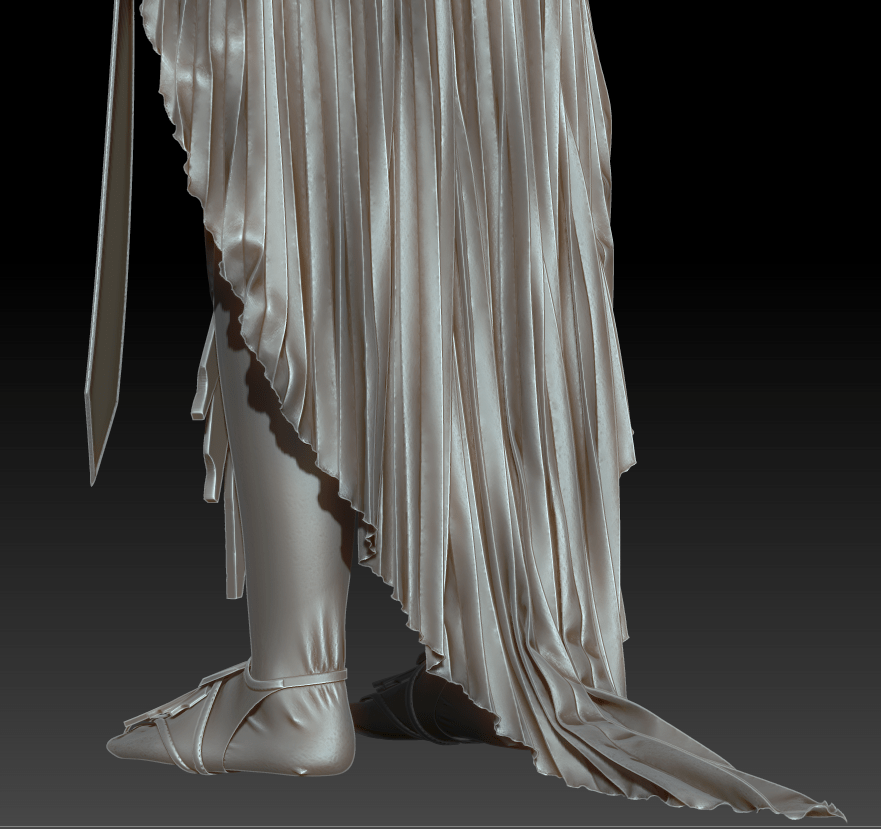
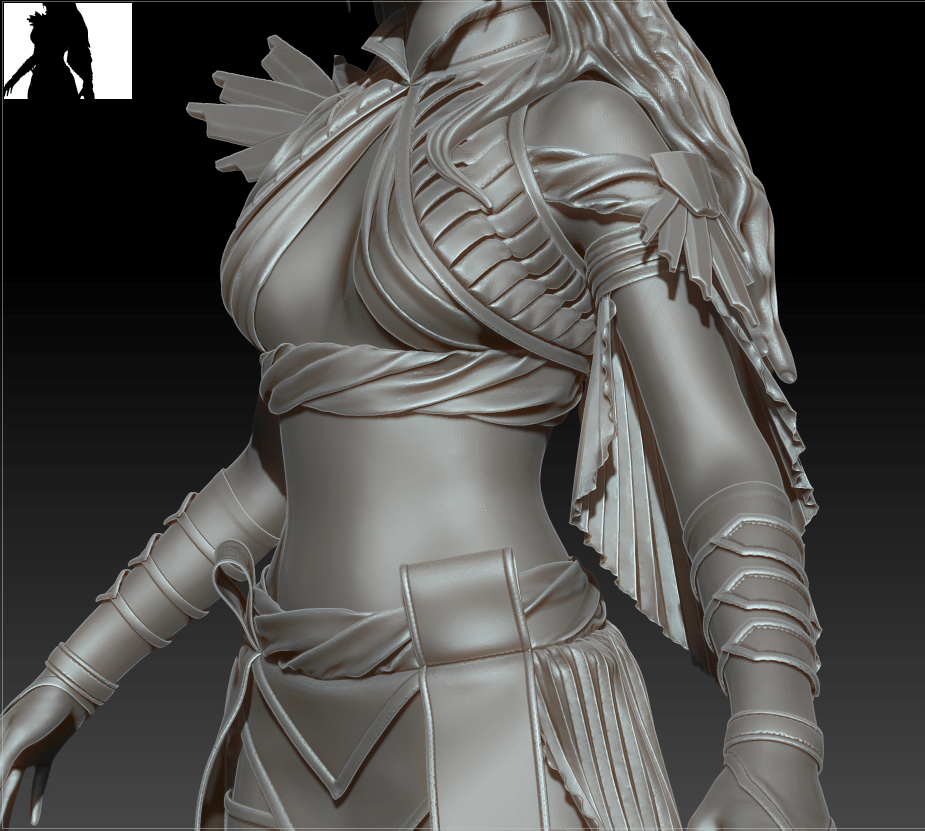
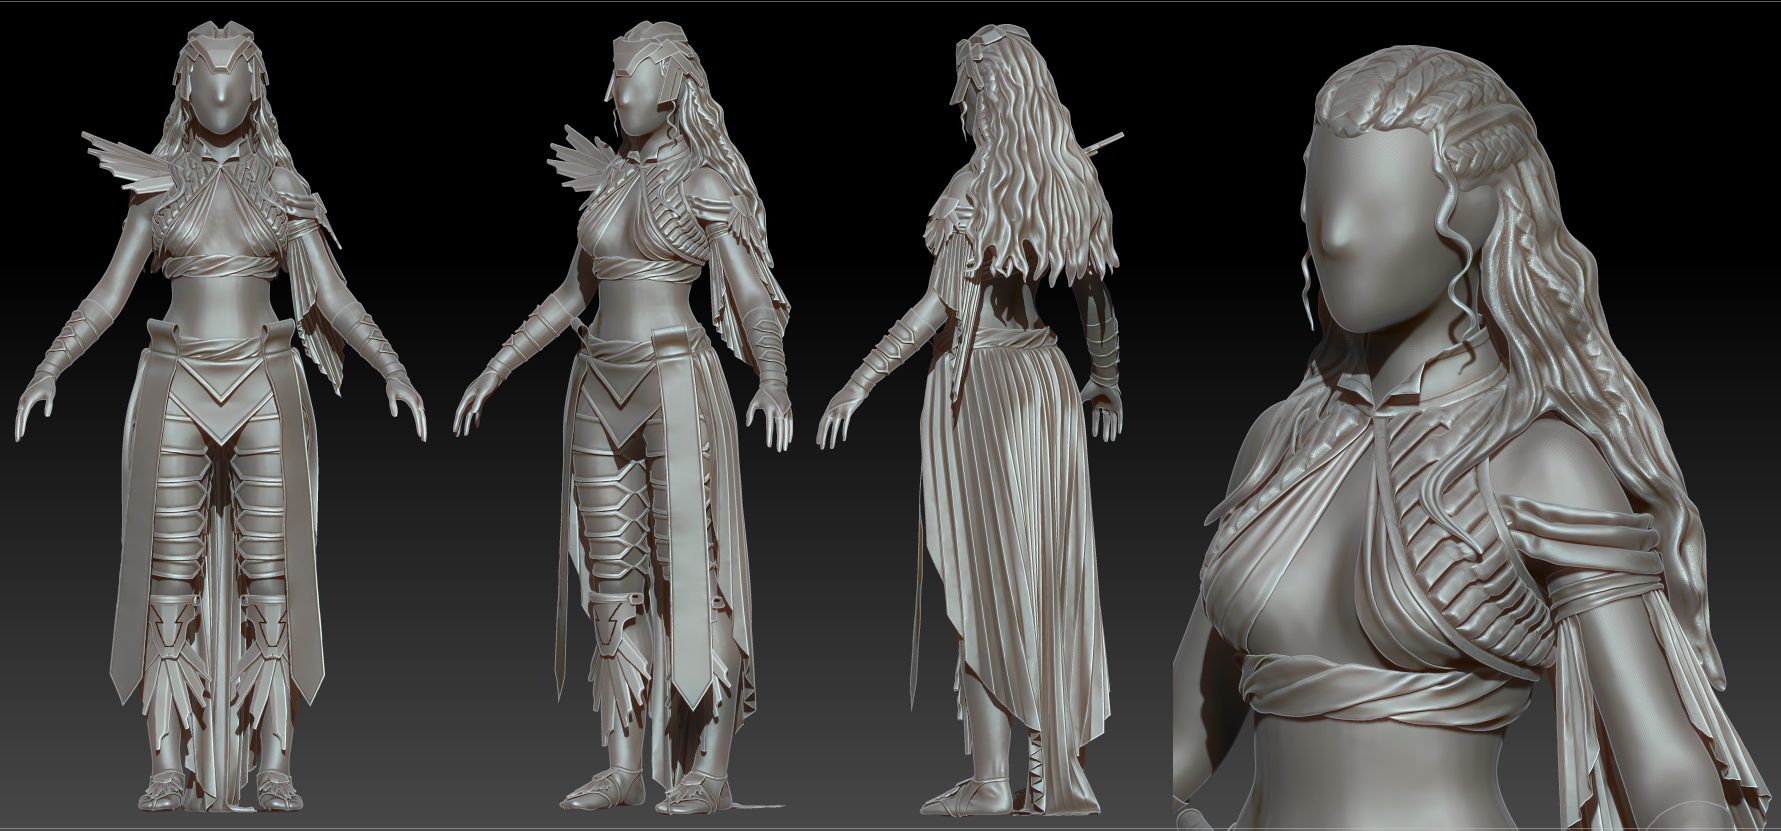
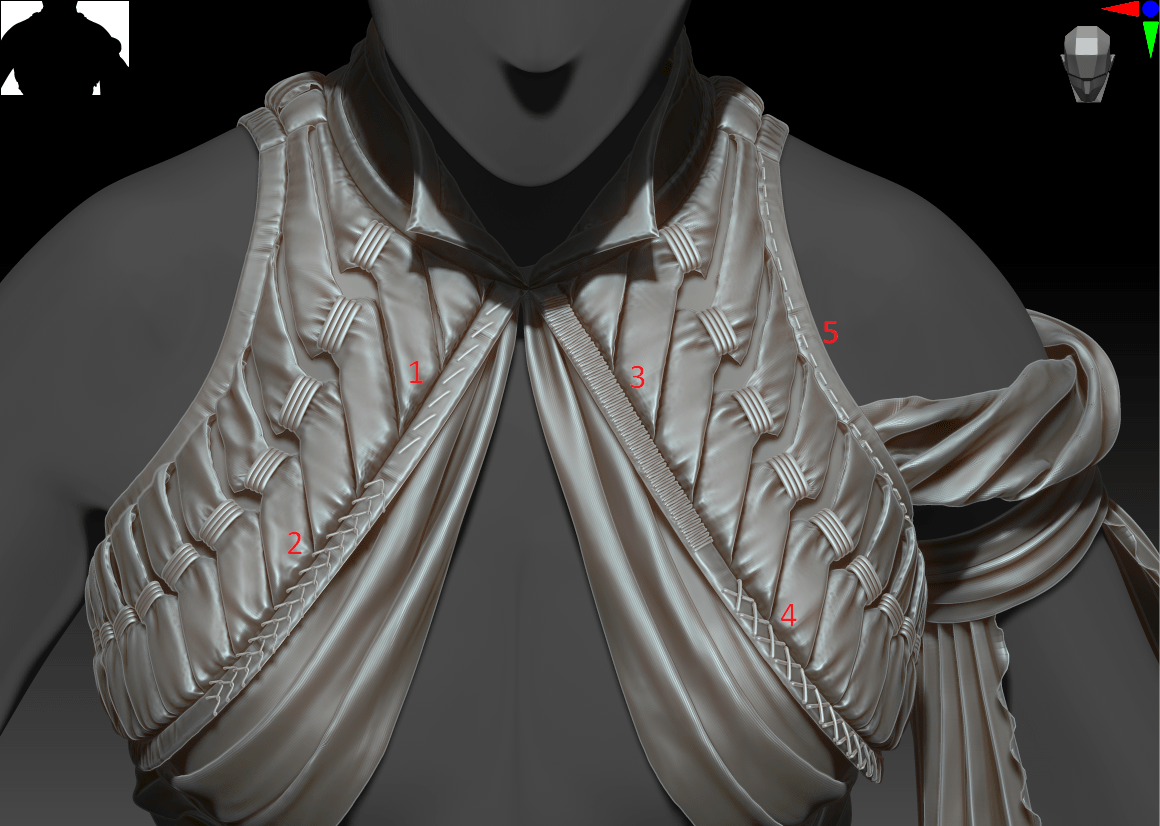
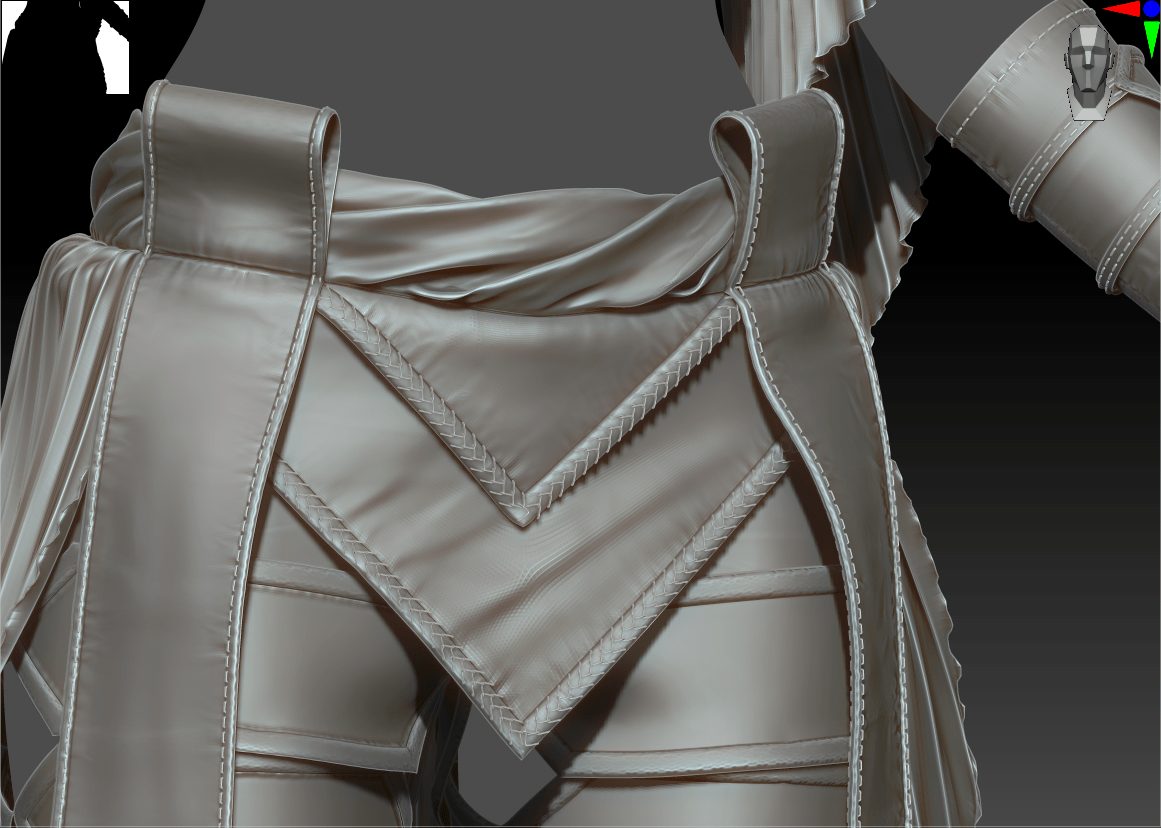
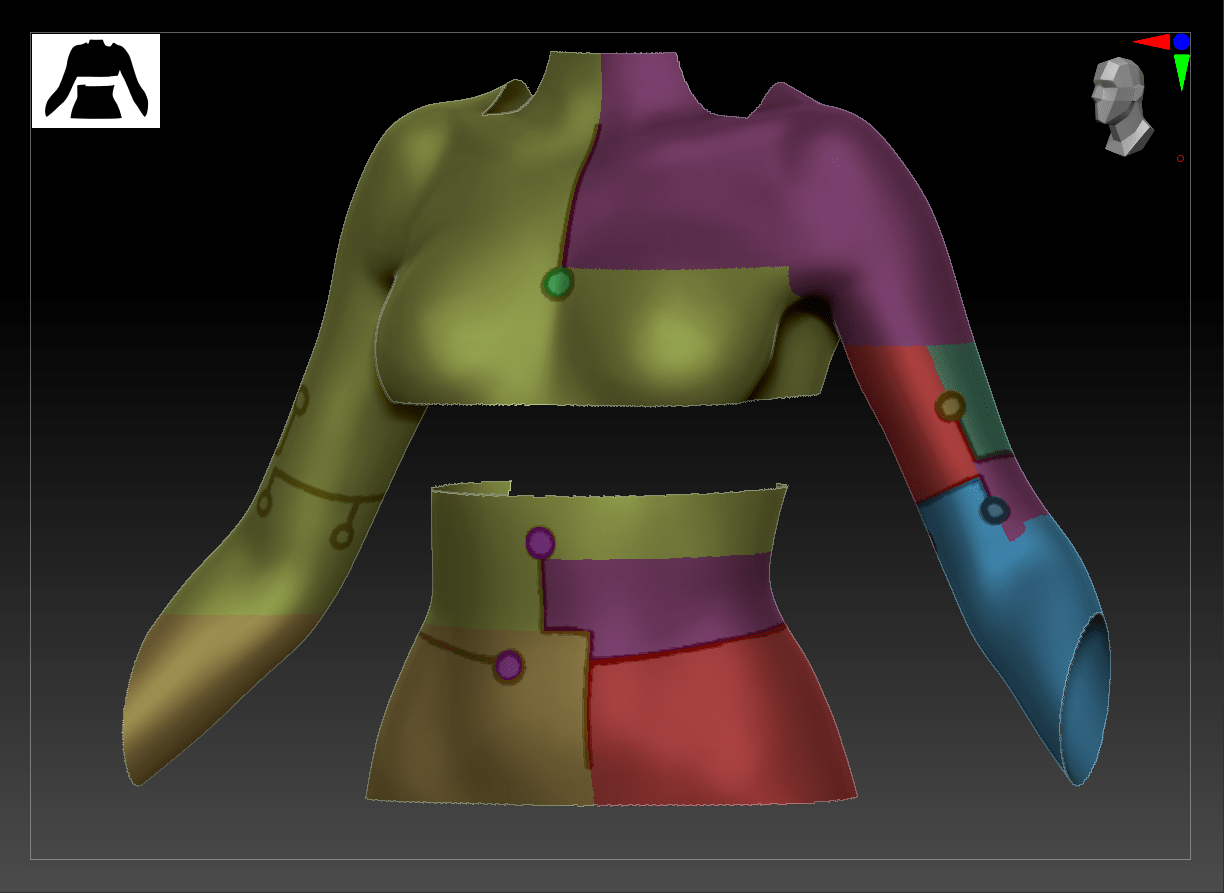
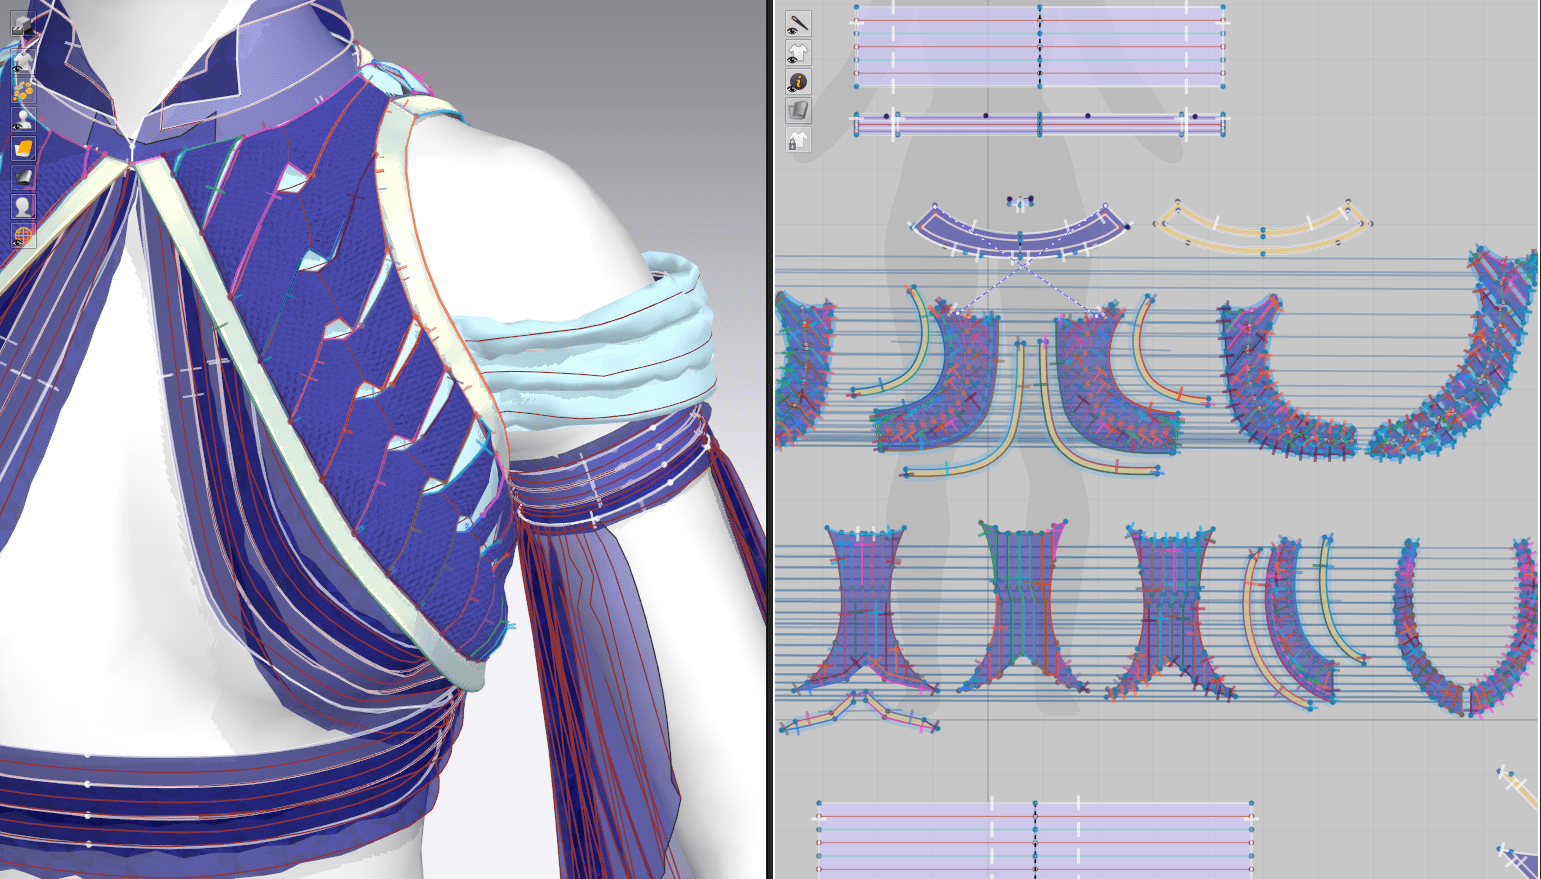
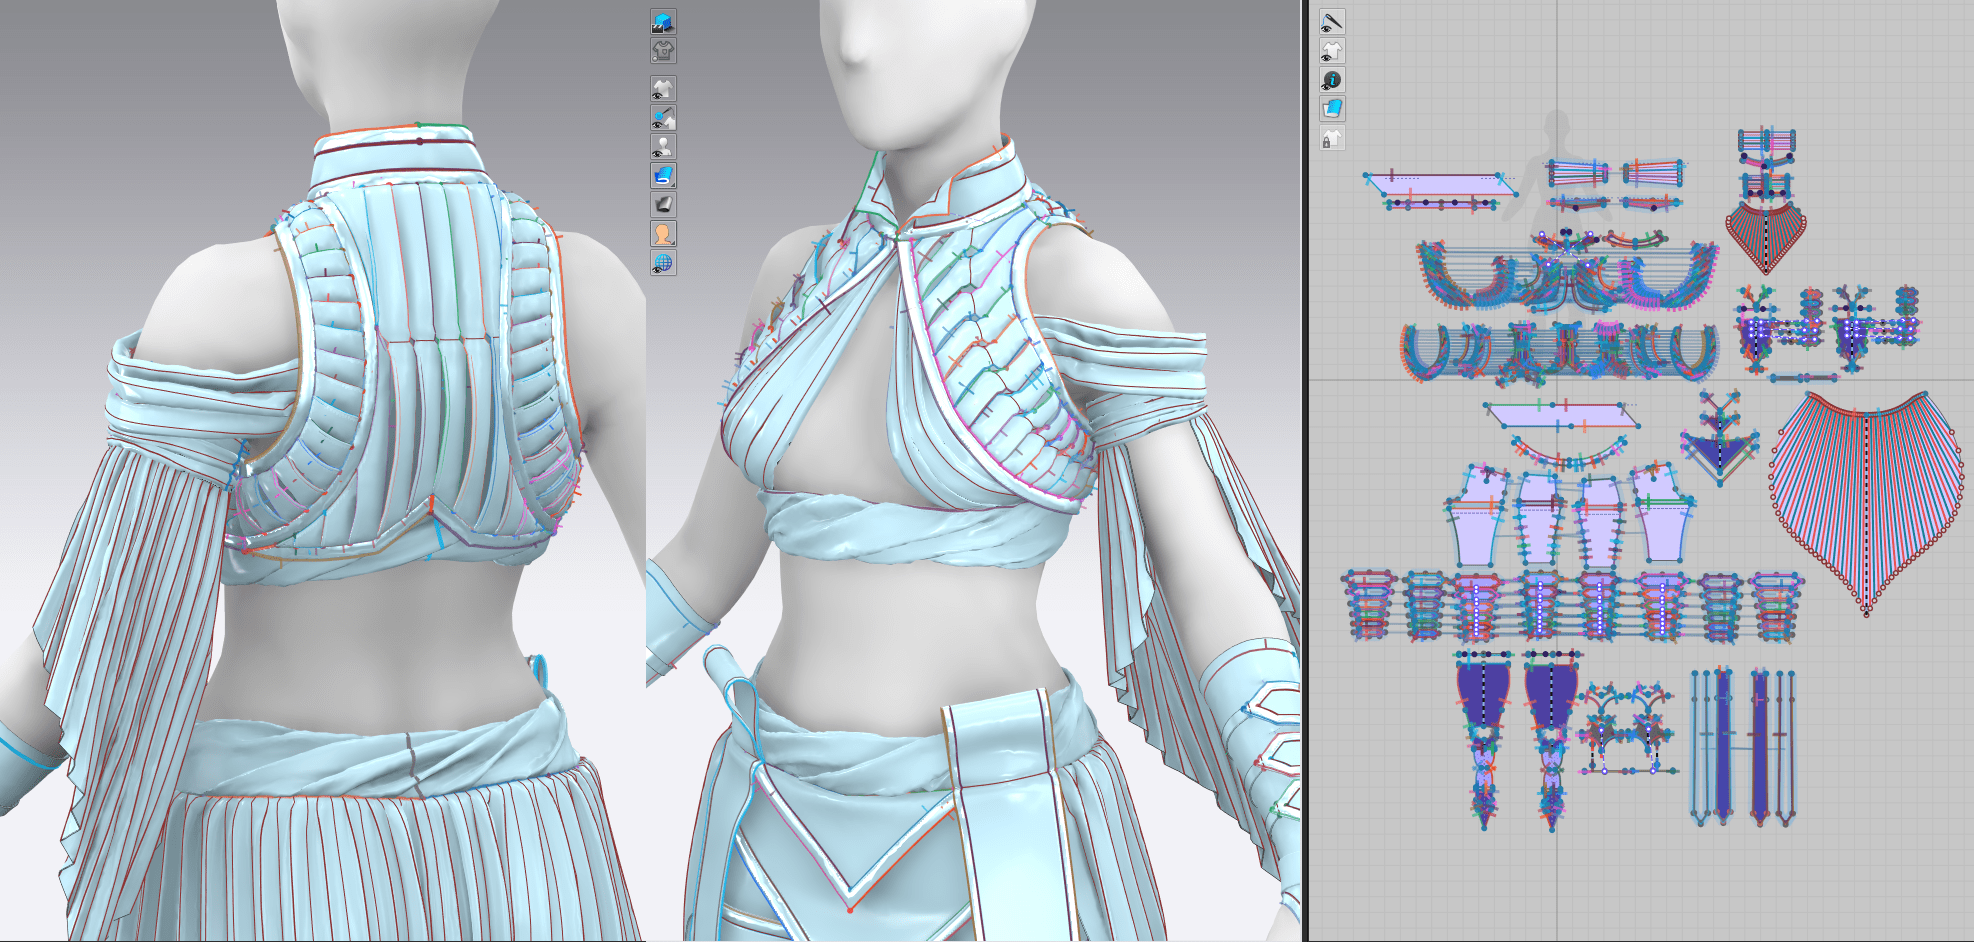
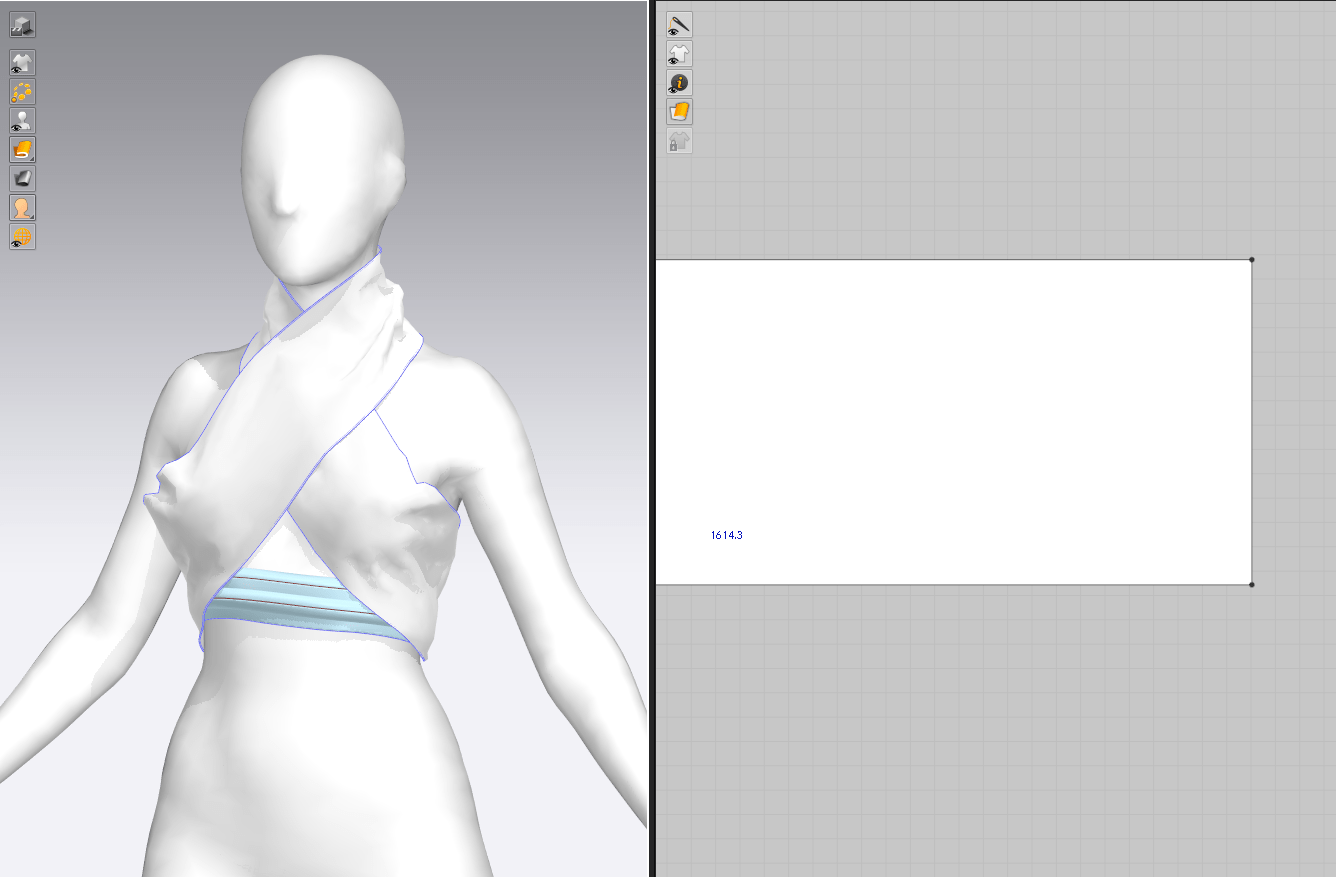
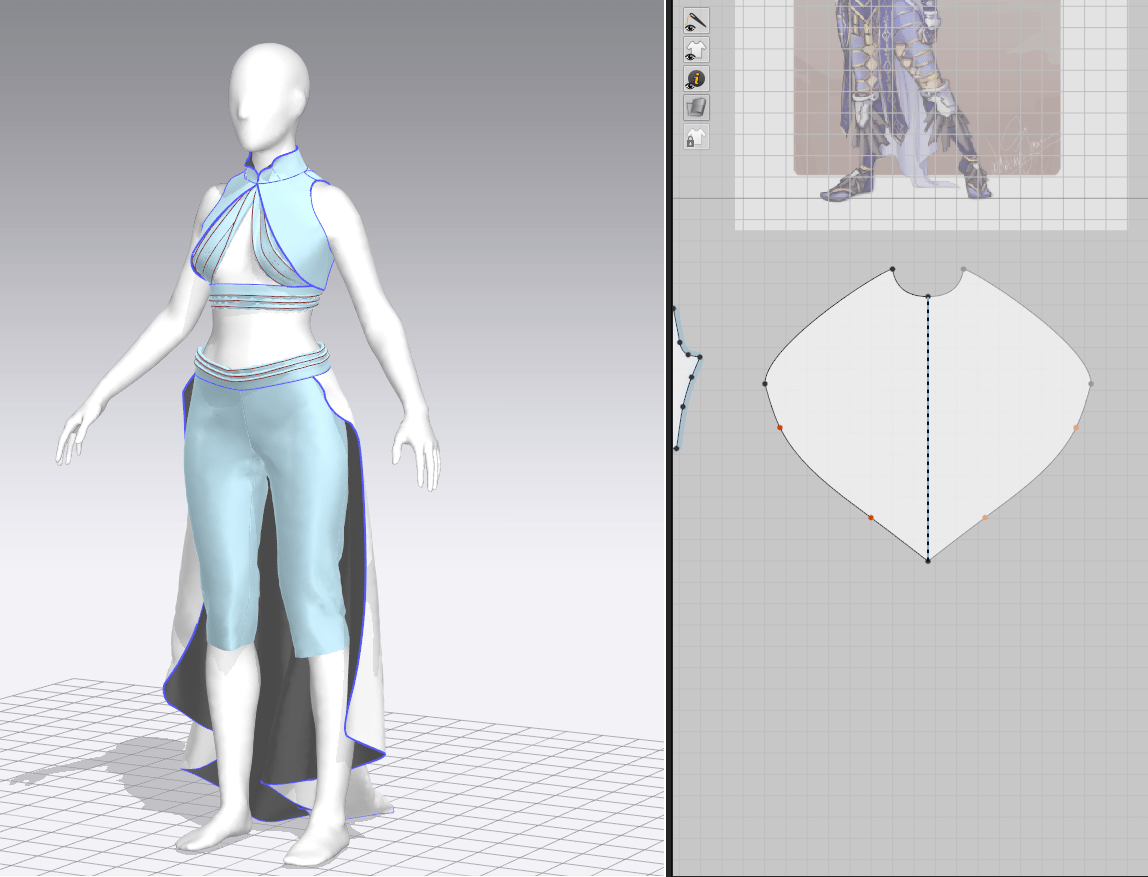
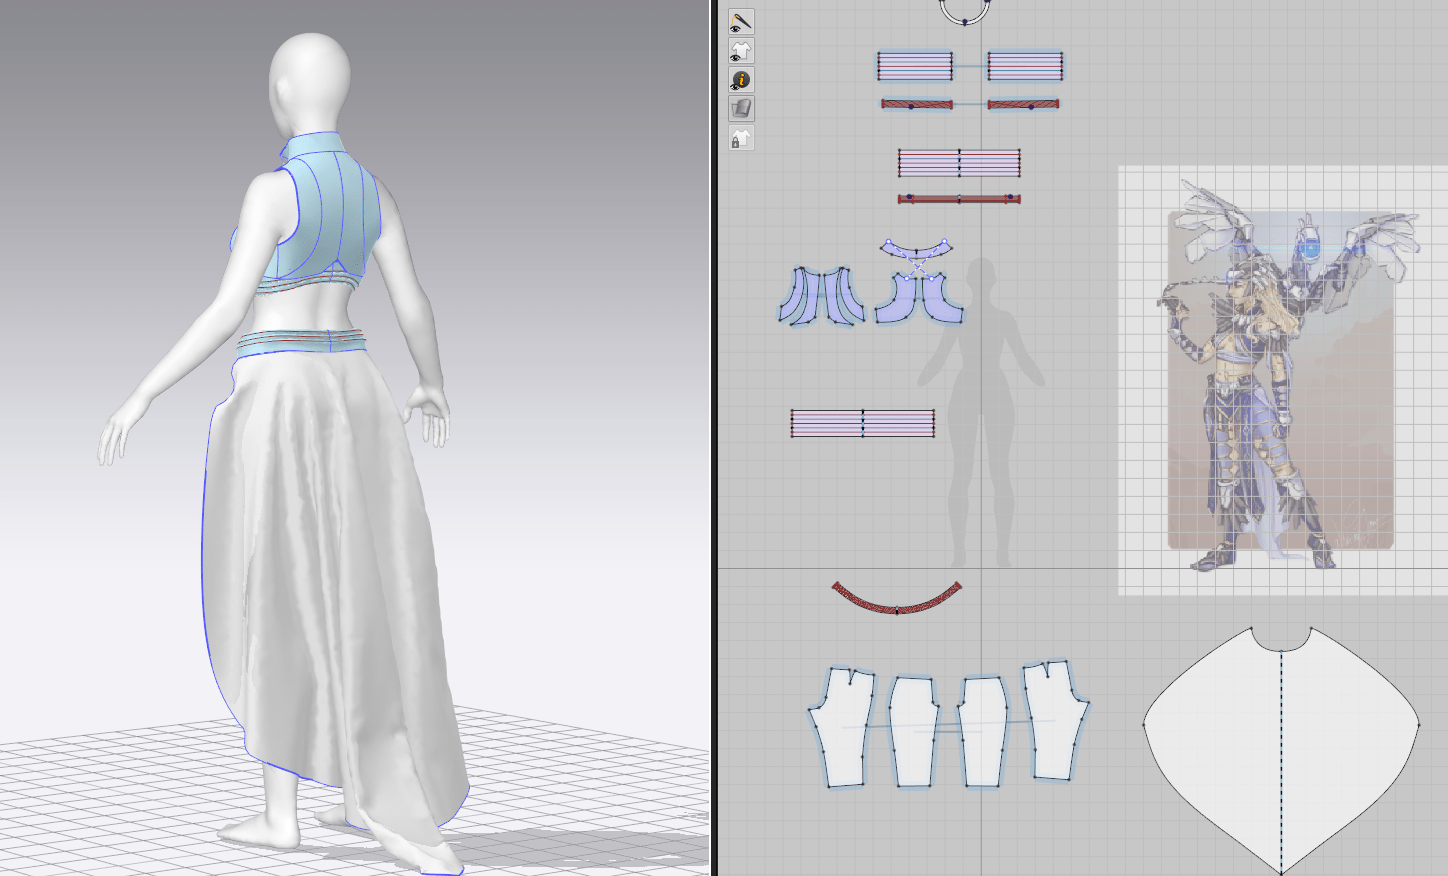
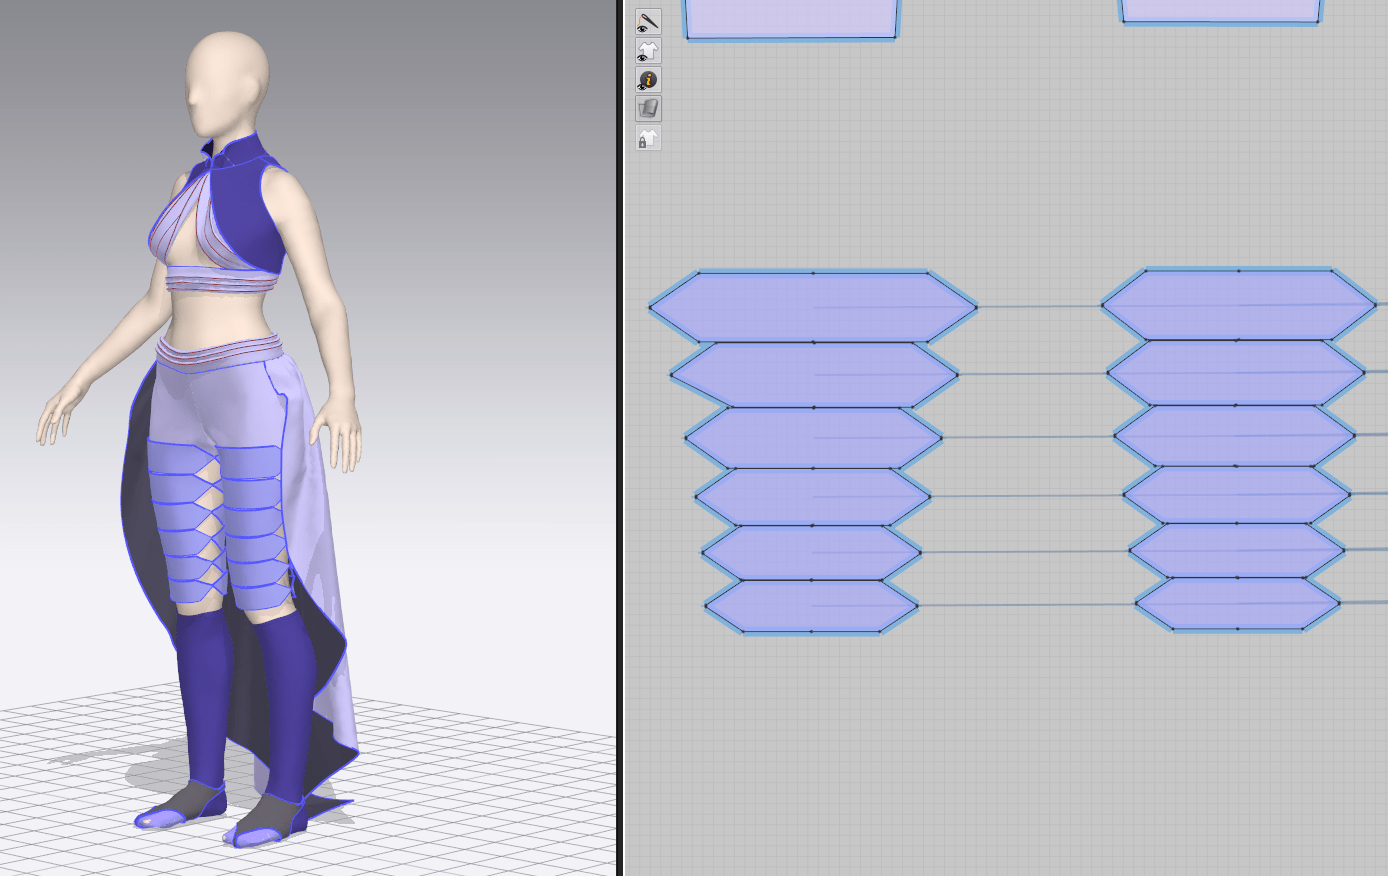
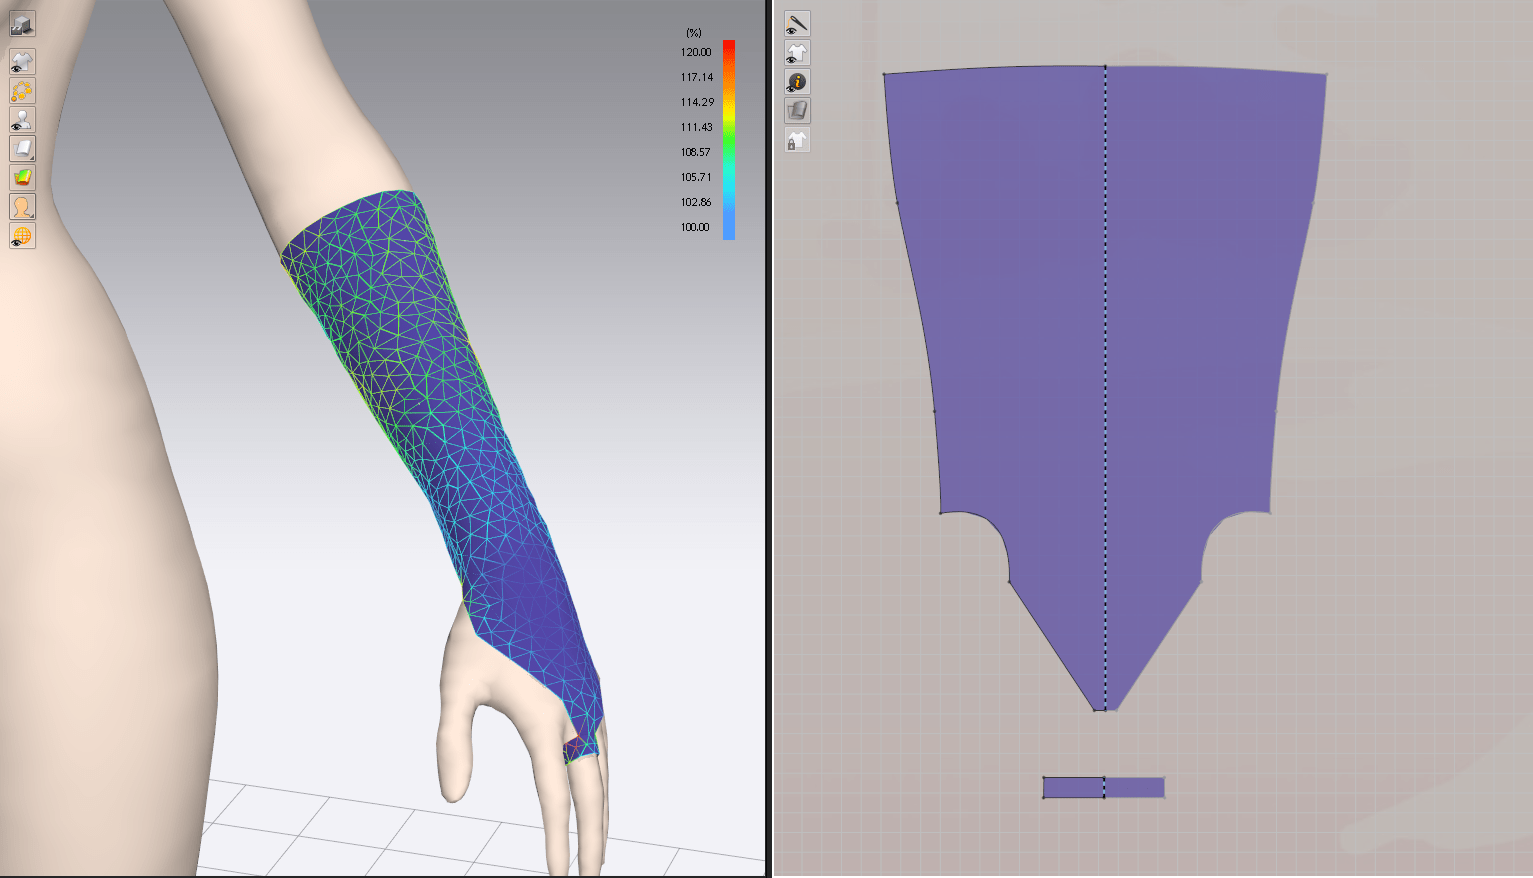
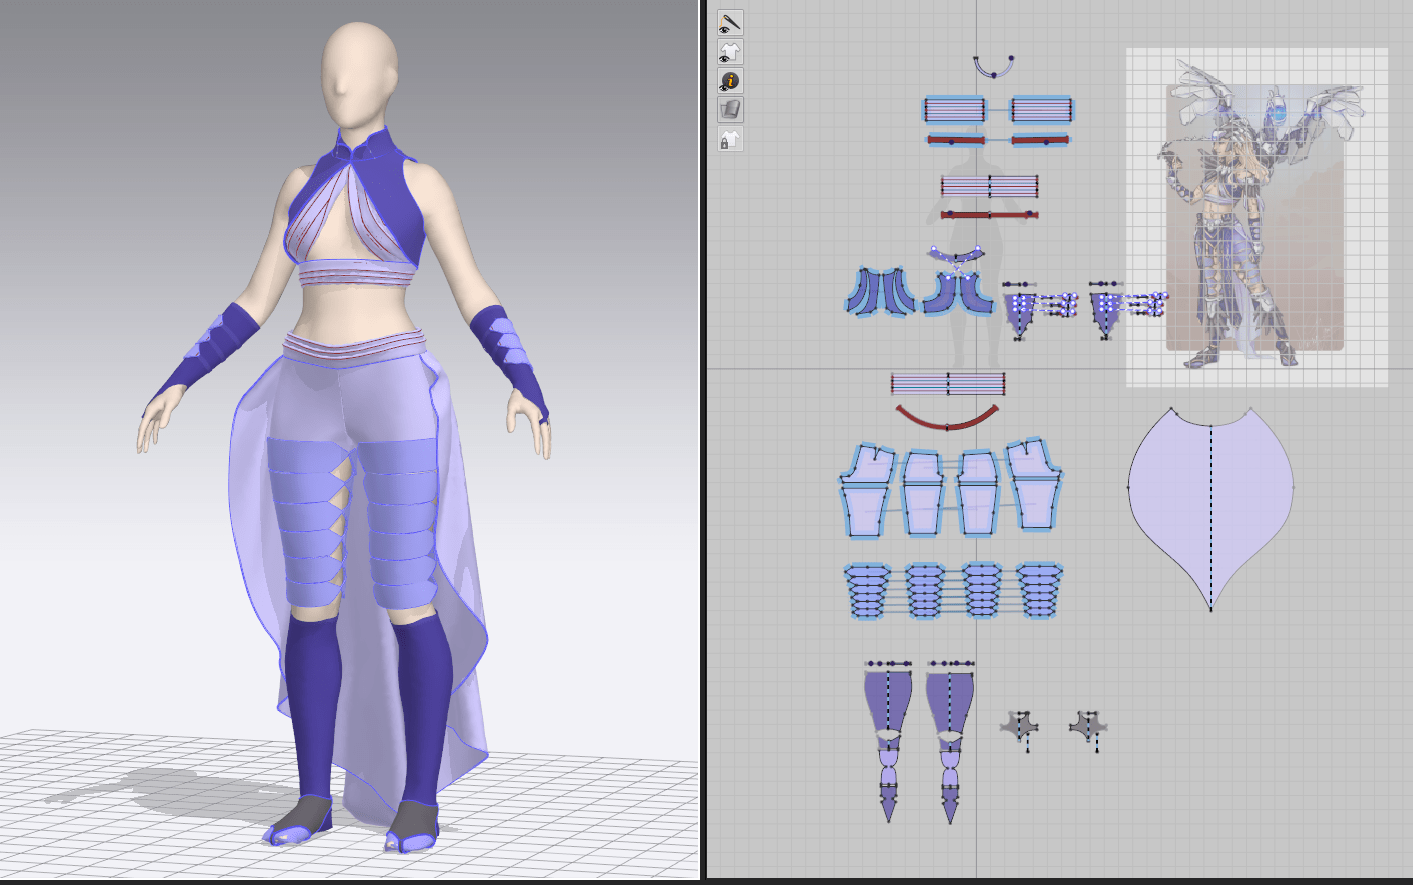
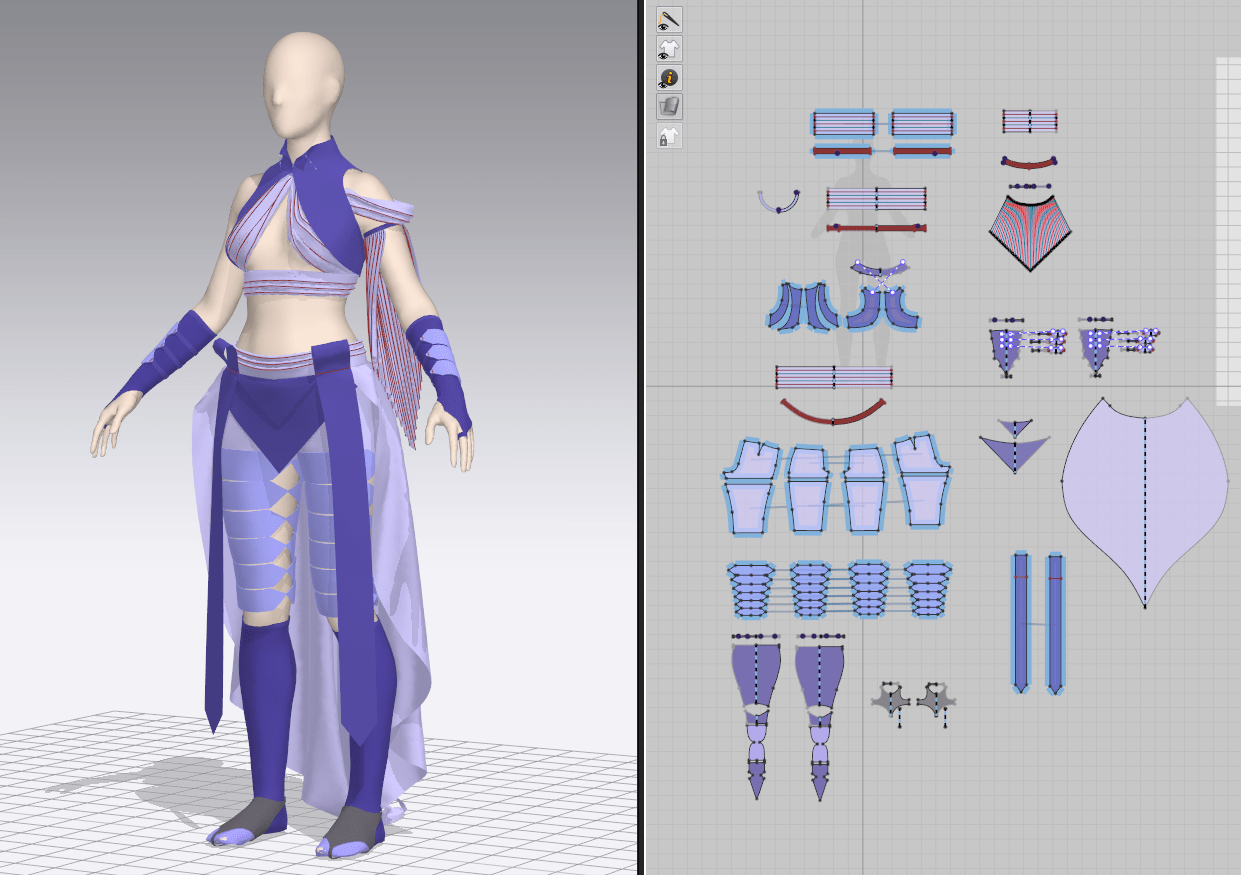
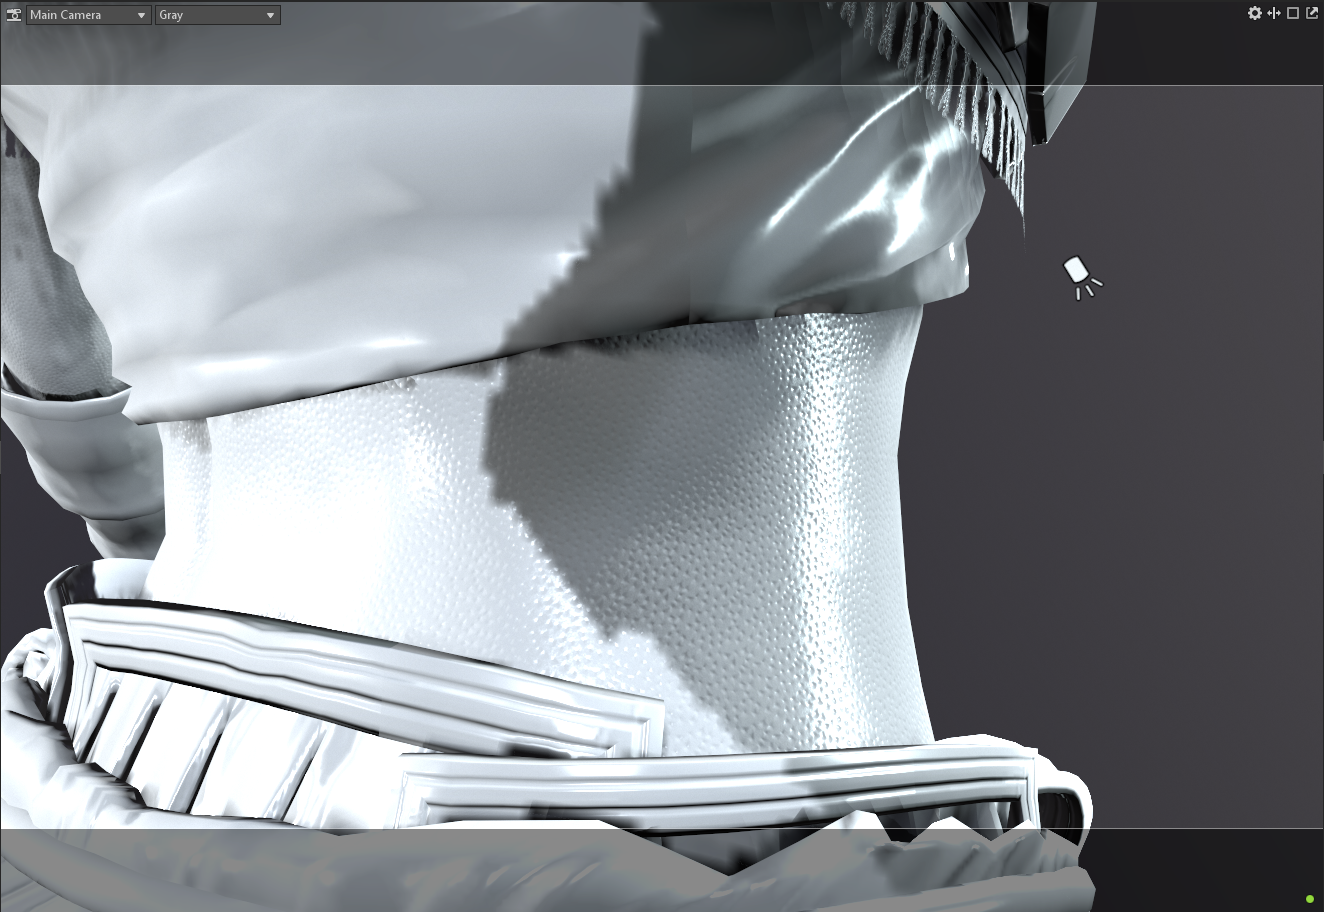
  • Pair of stays-esque vest, over a billowy sleeved partially off-the-shoulder top, with pleated? wide leg pants (OR harem pants with intricate designs, cutouts, lacing?) and a split overskirt (or gathered up), maybe with some jewelry/filigree pieces like arm cuffs and belts, maybe pieces she took from graves
  • Skeleton familiar has matching opposite pieces so it’s clear she stole stuff from him (maybe she has the left pauldron and he has the right one in a set)
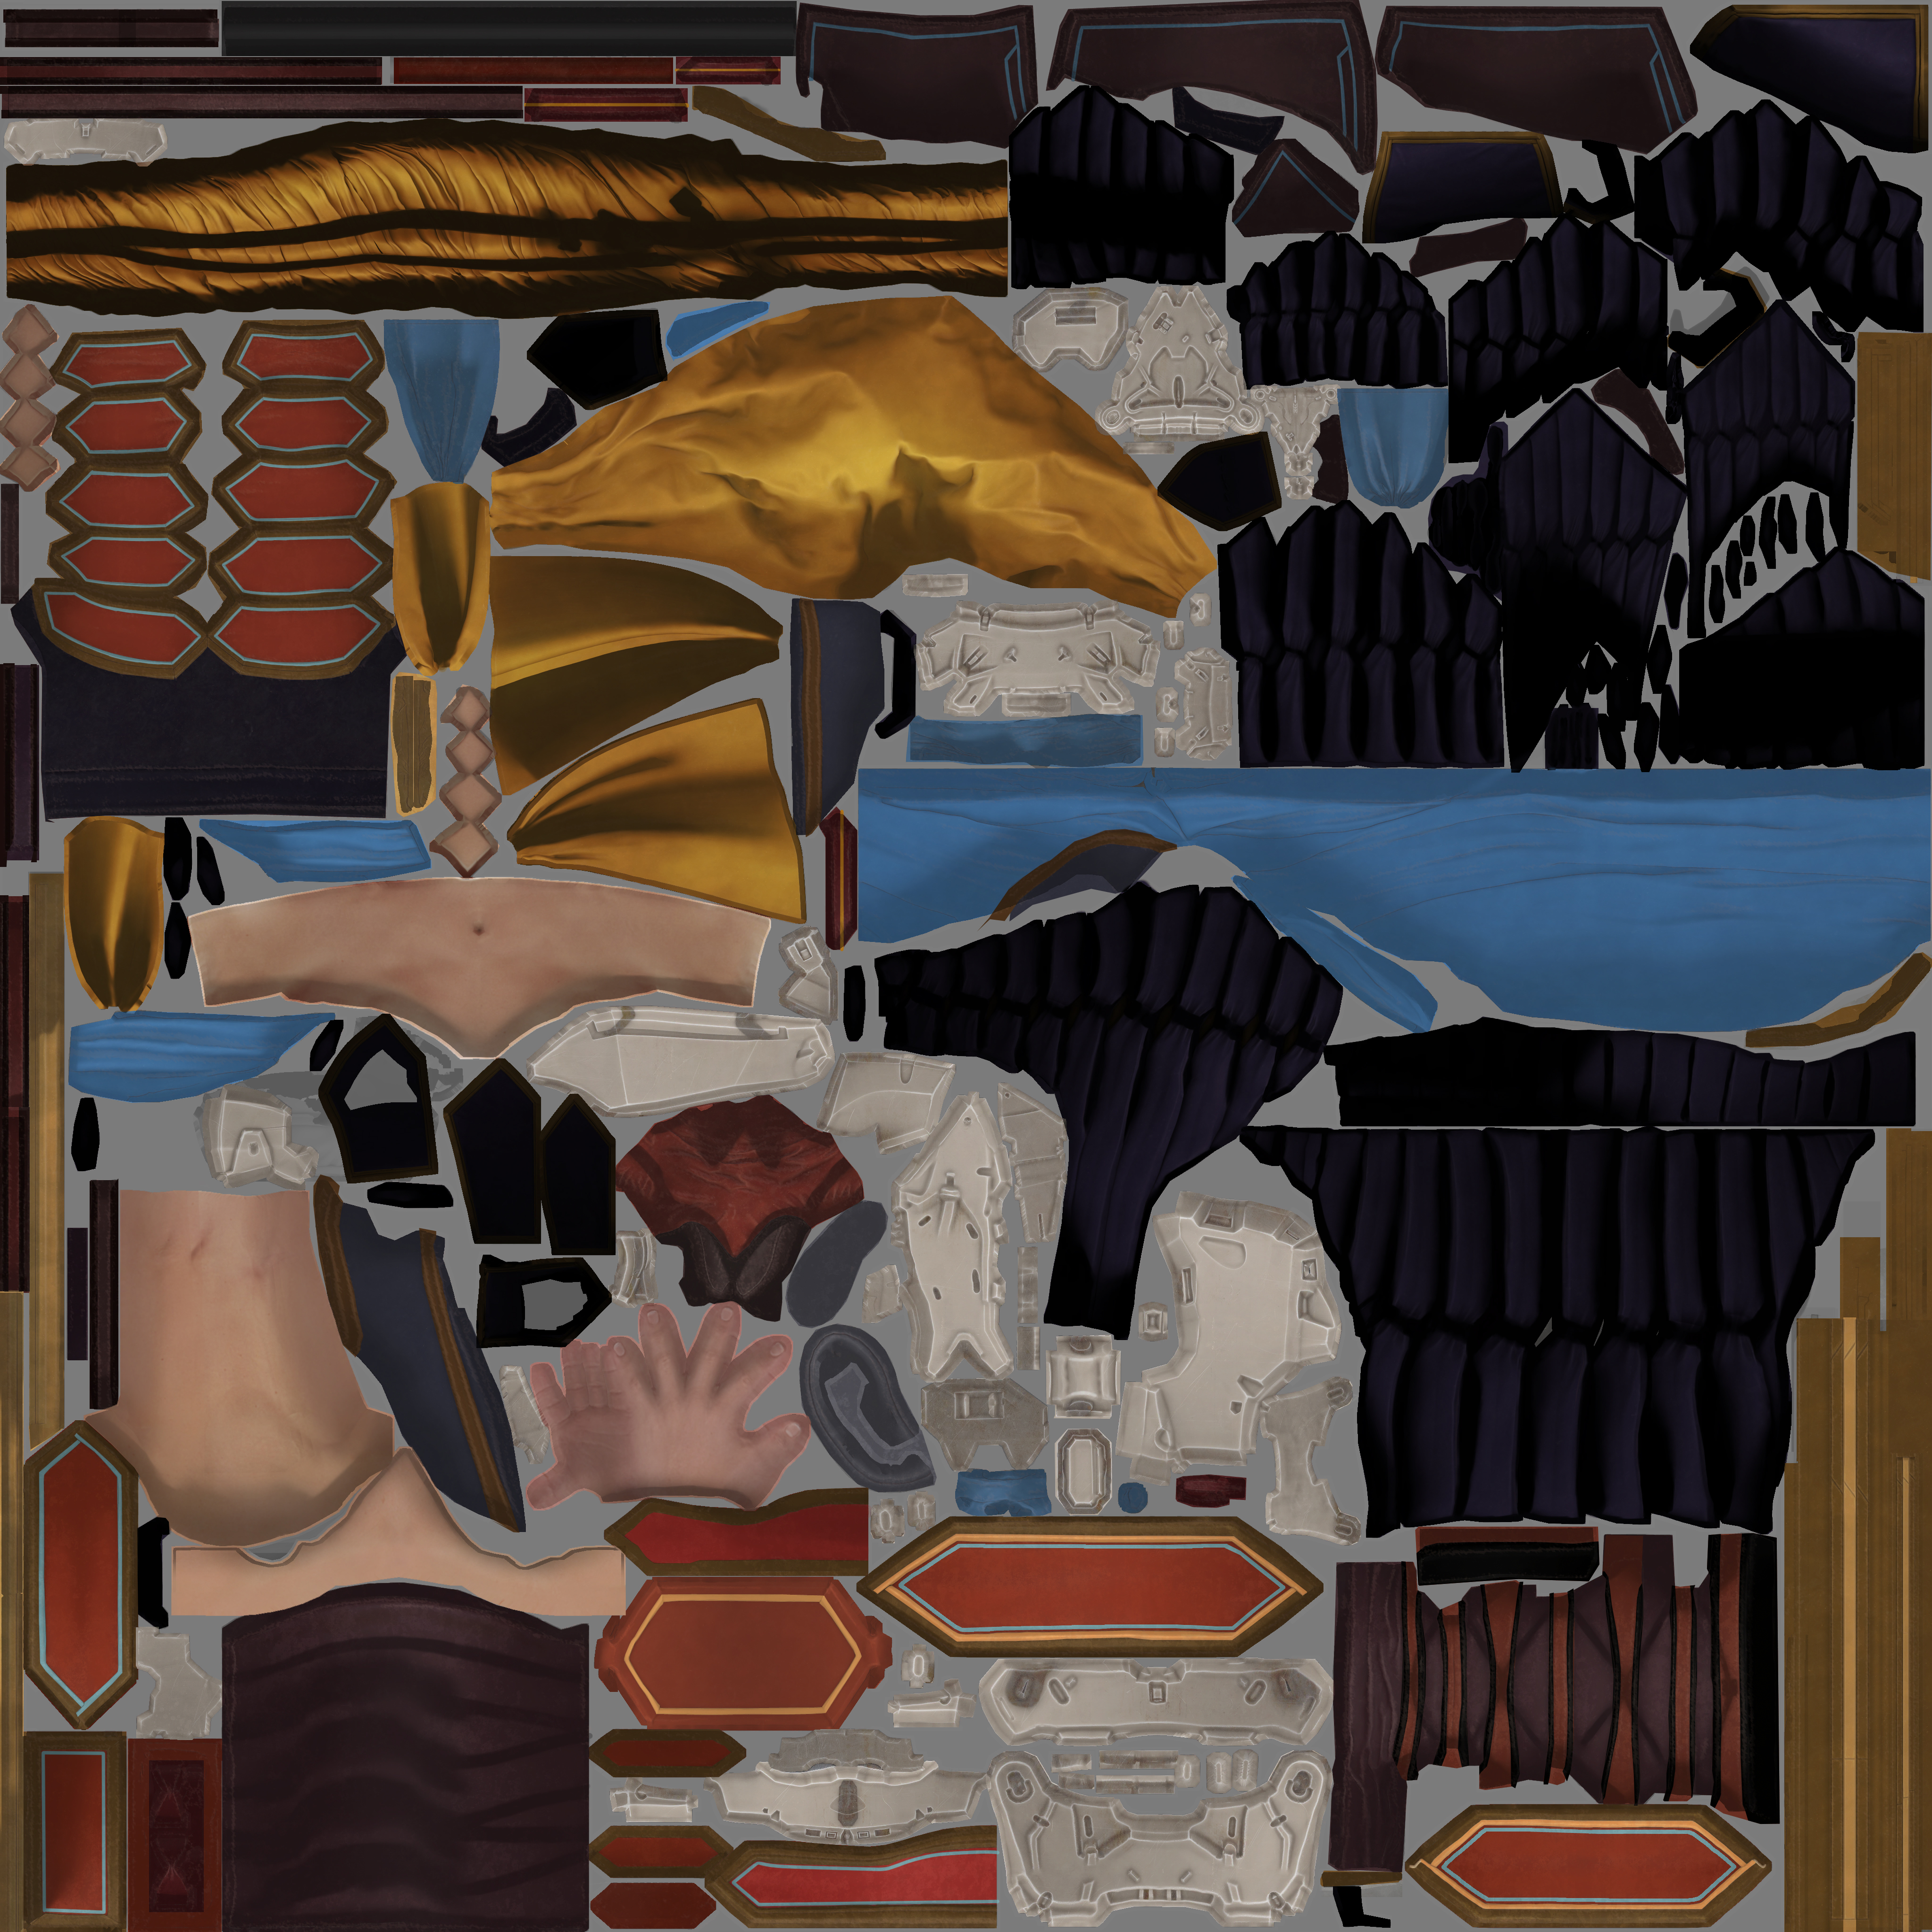
  • Belt covered in tools (for necromancy and healing, probably filigreed) and eclectic trinkets stolen from graves; loads of different eras, genres, levels of wear/patina/cleanliness
  • E.g. some jewelry that looks very Viking but also arm cuffs that are really Grecian and some pirate-coin belt trimming
  • Fairly simple rustic clothing so I can get some good woven textures in there and play with minor tears, fraying, and dirt on her clothes; sunbleached and worn areas/highlights
  • Loads of fabric details: layers of skirts, quilting, embroidery, SMOCKING
  • Alignment: chaotic neutral necromancy-specialization wizard

Skeleton

  • Male (for practice with male anatomy) with some musculature/clothing?
  • Skeleton familiar wearing Viking-style rags with a more pristine tunic top on top that she clearly gave him recently. Maybe a little embroidered floral design on it?
  • Embroidered skull/bones with flowers, clearly hand-done with errors

Environment

  • Door and maybe windows ajar, allowed a partial glimpse into the building?
  • Cottage is surrounded by small garden in a forest glade, super chill, maybe some light rays and dust
  • Lots of slightly creepy elements that aren’t immediately noticeable to indicate the necromancer side of things
  • House with some tree kind of encapsulating it, giving a skeletal vibe
  • Possible style: piecemeal or otherwise representative of a real DnD terrain, with seamlines or other indicators; tilt-shift on a wooden tabletop with blurry viewers in the background?
  • Instead of a full scene, simply a floating chunk of land with part of a house visible (front door, doorstep, window, etc.)
  • Skeletal hands planted in a windowbox surrounded by flowers
  • Workbench with mud-covered gold pieces that her charges were buried with
  • Just a vignette of the house: part of a front door/window/step that fades into nothing (or fades away with loose bricks)

Bibliography

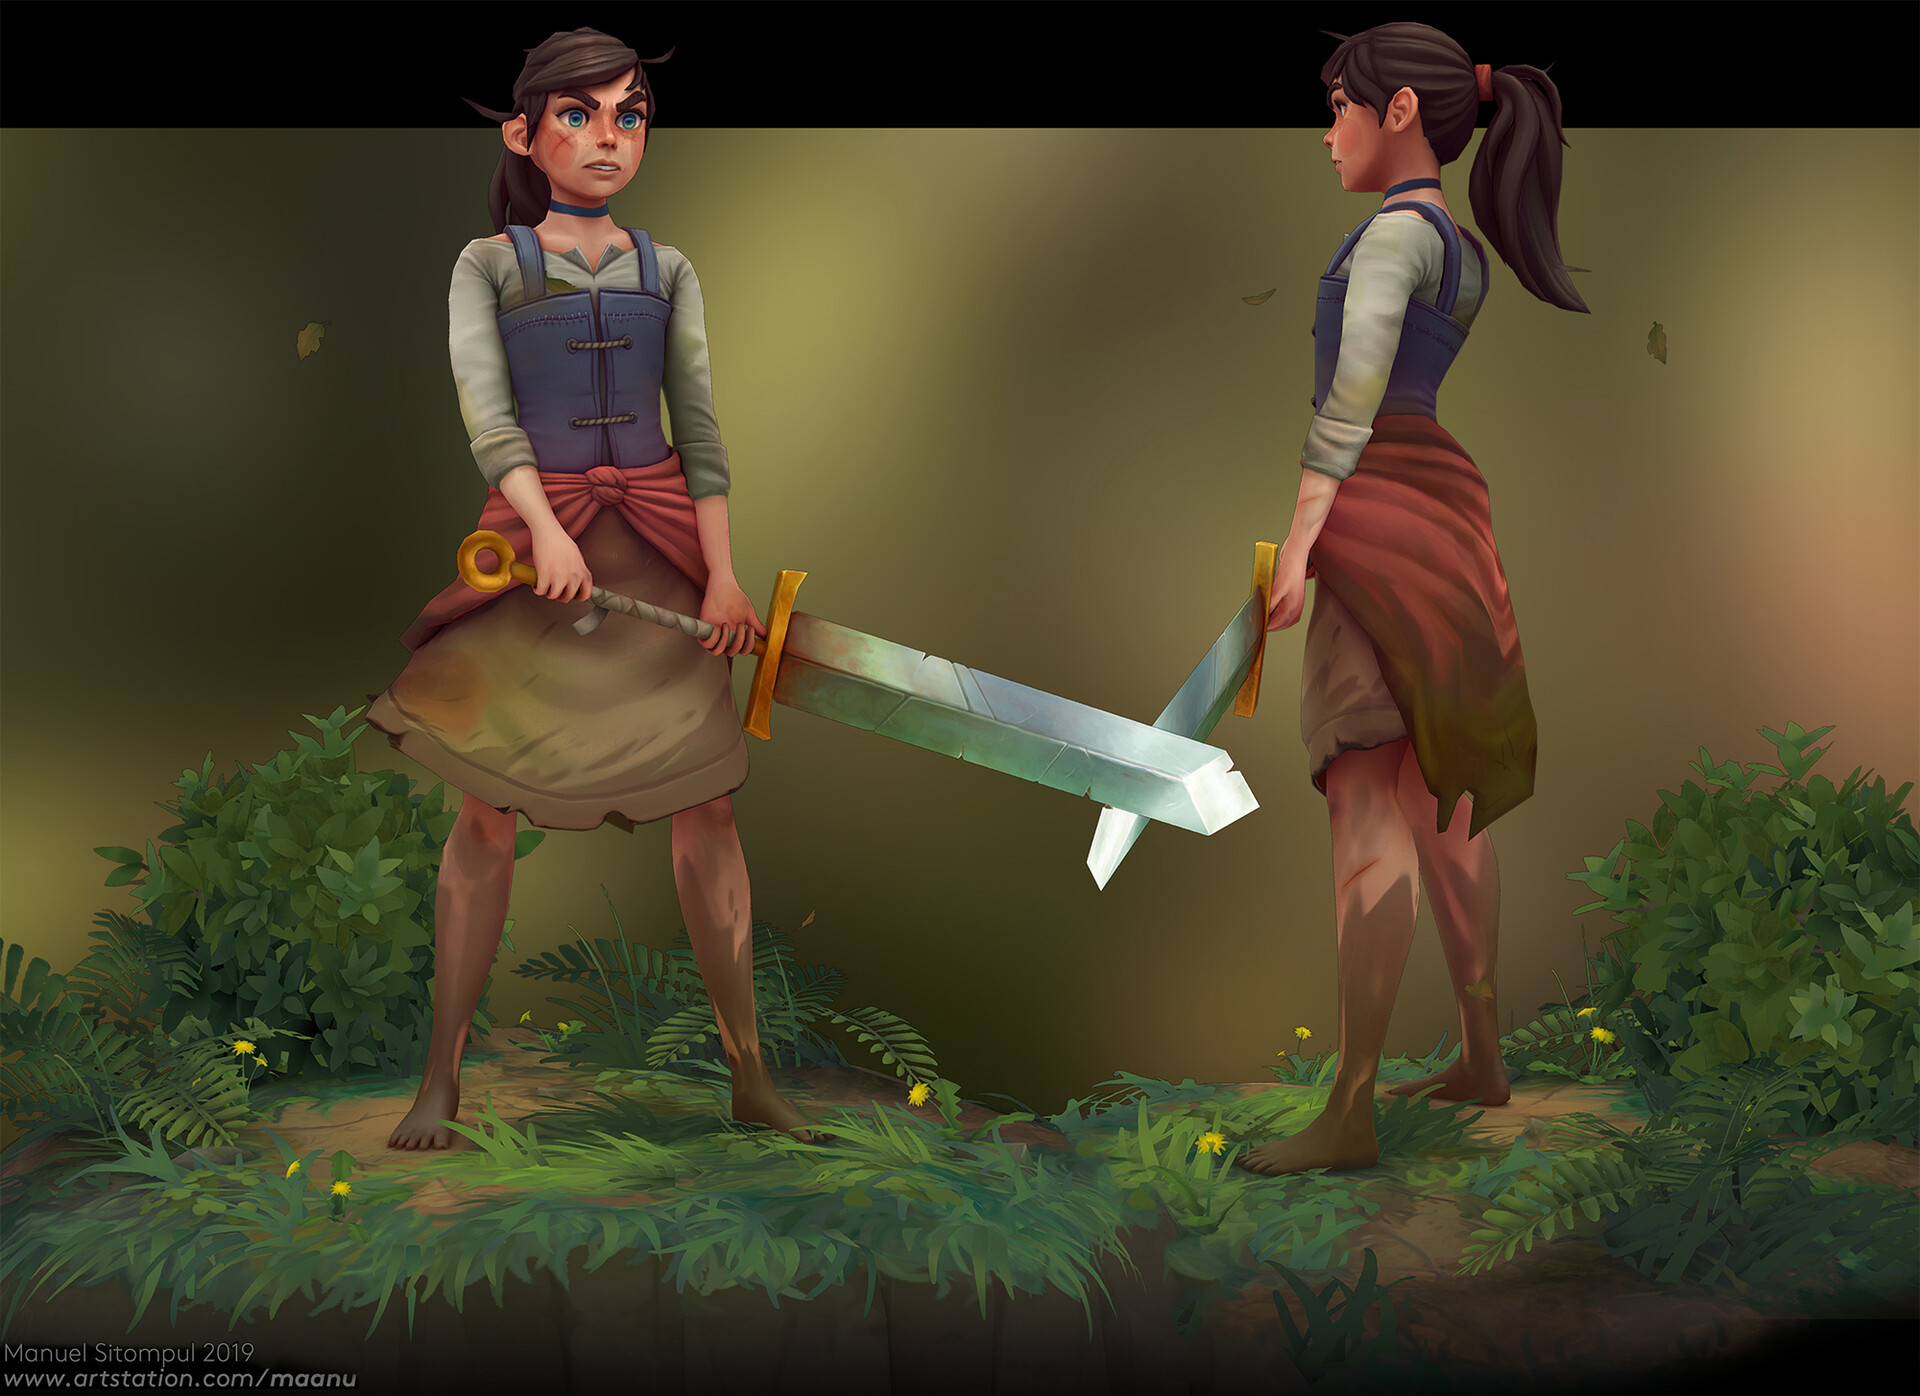
Christian, B., 2021. Skaab Wrangler – MTG Innistrad. [image] Available at: https://www.artstation.com/artwork/eaAQPD [Accessed 1 April 2022].

Practice 2: Live Brief Self-Critique

Practice 2

Athena Cole – CPP Live Brief

When I first approached this assignment, I thought of my favorite sci-fi properties, which generally had one thing in common: they all contain some fantasy elements. Perhaps one of the best examples of this is the game Horizon Zero Dawn, which has an aesthetic I’ve always been drawn to. Therefore, I sought to create a piece that could exist somewhere in that universe but still have original elements.

I chose a concept art piece by Whitney Lanier, a crossover between Daenerys from Game of Thrones and Aloy from Horizon Zero Dawn. It has both hard-surface and organic clothing elements, including an opportunity to do some complex patterning and fabric manipulation, and is based on two of my favorite series. After obtaining enthusiastic permission from the artist to use it as inspiration, I started with the garments in Marvelous Designer.

The MD stage went extremely well – I was able to create the basis of the clothing within the first week, and refined it more through the next. I’m especially proud of the textile work on the vest; it’s a clear match to one of the canonical Aloy designs, and I spent several days experimenting to recreate that effect. I ended up slicing up the vest pattern, making a replica copy of a hundred+ small pattern pieces, and stitching them together with pressure. This forced me to gain a really solid understanding of seam angles and seam length matching as I assembled such a complex garment.

Unfortunately, once I left Marvelous, the rest of the character work was far less straightforward. I wanted to really nail down the process for converting extremely high-poly MD simulations into clean quad topology while maintaining all the detail and the neat UV shapes of the original pattern pieces. This involves manual retopo of the flat pattern pieces and transferring attributes in Maya on a piece-by-piece basis (avoiding issues with underhangs and overlapping fabric that would occur if I simply used ZBrush’s projection tool). I had practiced this on previous projects, but my focus this time was a) becoming comfortable with Maya’s quad draw and b) keeping the polycount very low, both of which I achieved with moderate success. That said, retopo still takes me an enormous amount of time, and I struggled with time management for the last stretch of this assignment.

I did take a few days once I had good high-poly meshes in ZBrush to add as much sculpted detail as I could to the fabric parts. This included creases, seam lines, large wrinkles, stitching designs, and general cleanup. I have a fair amount of real-world knowledge about how fabric behaves, but felt I wasn’t deliberate or dramatic enough in adding detail previously (with much of it being lost in texturing). This turned out quite well – I’m getting much better at identifying where to add which type of detail and how ‘hard’ to go with it, and I think my piece ultimately looks best at the ZBrush stage.

In contrast, the armor pieces were an area where I really struggled. Having seen several live demos from artists that worked on the original Horizon Zero Dawn costumes, I knew that even the hard-surface pieces were done first in high-poly dynameshed sculpts and then retopologized, rather than starting low. However, I’m still working on my hard-surface skills; even seeing the exact brushes and settings used, I couldn’t quite replicate those crispy sharp edges. I also really wasn’t sure at which stage I should be adding in the details like panel lines and greebles, so I kept putting off working on the armor, and it ended up being quite rushed for the deadline. As opposed to my neatly retopoed fabric, most of the armor was simply decimated using ZBrush’s automatic tool into (incredibly messy) triangles, and then auto-unwrapped. I absolutely need to go back in and manually retopo, clean up my sculpts, and then add in the details after the fact to get the cleanest bakes. I did manage to make good use of the texture space in one regard: I noticed that the brown spike parts of the armor was replicated many times (shoulders, knees, feet, belt), so I created that piece with clean topology and replicated it so that every one of those pieces uses a single section of the texture sheet. I intend to repeat that process for any of the other replicated/mirrored armor pieces.

I tried to keep the textures somewhere between the extreme realism of HZD/GoT and the hand-painted concept artwork. Most of my textures were programmatically generated using curvature and gradientsin Substance Painter, with very little hand-painting at this stage while I consider the UVs still a work-in-progress. They have faint fabric textures overlaid on top, but only enough to add roughness without losing my carefully-created sculpted details. I also added some custom height maps for embroidery and other masked areas. In general, I feel like my baking and texturing process wasn’t very successful. I have many artifacts despite playing around with bake settings, and much of my detail is pixelated or blurred compared to the original sculpt. More experimentation is needed!

Apart from a bit more refining on the armor, I think this piece is quite successful as a costume showcase. However, it’s still missing a lot before I can consider it a finished character sculpt. I roughly sculpted a hairstyle in ZBrush, but decided it was obscuring much of my careful work on the collar and vest. I plan to explore hair card creation to make her hairstyle instead, which is a new skill for me. She also obviously needs a face and detailed body! If I’m able, I’d like to go in and add her dragon as an accessory, since it really defines the character (and is a clever nod to both reference properties), and I’d like to give her a more dynamic pose as well. Finally, I’m still working on my lighting setups within Marmoset; my current piece is quite flat and could use more dynamic lights and background contrast.

Practice 2: Scene Setup + Final Renders (LB 8)

Practice 2

Scene Setup

My scene setup in Marmoset was fairly straightforward: a canyon HDRI mainly to add a small amount of universal light and for a nicely blurred background (default with the program), a couple slightly colored fill lights primarily in front, a large warm light in the upper RHS to emulate sunlight, and a neutral rimlight to emphasize details. I added a minor amount of post-processing to the camera but generally left the scene as-is.

Final Renders

I tried a few options for the final renders, both on a neutral colored background with a vignette and with the HDRI. I think the neutral shows off the sculpt marginally better, while the HDRI gives more context to the scene. Neither are particularly dynamic, however, and I would eventually like to go back and tweak the presentation.

Practice 2: Forefront: Hand-painted Texturing

Practice 2

Manuel Sitompul

Faced with a looming deadline and an untextured character, I sought out advice for rapidly creating those soft gradients and programatically-generated textures often seen in stylized looks. I had run across a very useful article by Manuel Sitompul a while back while investigating hand-painted looks for my Laudna sculpt, but didn’t have a chance to look into it in-depth. In reading further, I love the strong shapes and clear personality he’s created with this character, as well as his choice of creating a small grounding environment that fade outs – all of the elements are simply painted on but add a real ambiance to the piece.

Apart from a bunch of useful stylized sculpting tips, I was particularly impressed by the early-stage textures that he applied to the character in Substance Painter using (partially) automated tools, even before adding hand-painted details.

Much of this early texturing was done using a plugin called SoMuchDiffuse, which immediately looked promising from their example timelapses. It essentially combines a bunch of filters, gradients, and curve masks into a single smart material with every aspect editable. I purchased the tool to play around with in the hopes that I could put down some large, effective color onto my garment without needing to hand-paint every element.

Daenerys Application

I didn’t find the base materials to be too useful apart from the initial baked lighting, but it sped up the process significantly in that I didn’t have to make a few dozen separate smart layers for basic coloring. I ended up tweaking and customizing nearly all the settings, which went fairly quickly once I found my way around them. In the end, I applied a universal baked lighting to all of my fabric pieces, and then separate top-down gradients for additional color interest. I also made significant use of the cavity fill and highlights to bring out all those details I had previously sculpted in.

I didn’t have time to go in and add hand-painted elements to her costume, apart from bringing out a few areas of embossing or embroidery, but I actually am satisfied with the overall textures at this stage. In my previous work, I felt like much of the careful detailing was lost once textures were applied, and often I prefer the flat BPR render in ZBrush where they’re more visible, but I like the overall look of this piece.

Bibliography

Sitompul, M. (2019). Sculpting & Texturing a Fierce Character in 3D. [online] 80.lv. Available at: https://80.lv/articles/sculpting-texturing-a-fierce-character-in-3d/ [Accessed 12 March 2022].

Practice 2: Armor Refining + Retopo (LB 7)

Practice 2

Armor Adjustments

For some reason, I’ve been struggling quite a lot to simply sit down and work on the armor pieces. Hard-surface isn’t my strength and I’m still working on my techniques for creating harsh edges and detail lines without losing the overall shape. The result of this was that the armor was quite rushed and still needs some additional work.

I was able to do something decently clever that I’m pleased about: all of the repeated armor pieces (the flat spiky plates) I was able to retopo once and then replicate all over the costume, sometimes scaled or mirrored. This means that they all use the same small texture space and are generally very efficient.

Unique armor retopo

The same cannot, unfortunately, be said about the rest of the armor pieces. In my rush, I knew I didn’t have time to carefully retopologize them, but neither could I bake a few-million-poly armor set. I ended up simply running ZBrush’s decimation master plugin on the pieces, auto-unwrapping them in Maya, and baking onto those.

The end result is a very clean mesh in every other way with a complete jumbled, triangle-filled mess for all of the unique armor pieces. Visually, however, this process worked completely fine: the seams aren’t visible, and the polycount remains quite low, so it wasn’t the worst outcome (just don’t look under the hood!).

Practice 2: Clothing Retopo (LB 6)

Practice 2

Low-poly Method

I did a similar method for retopology that I used on my Laudna sculpt, converting Marvelous’s UVs into flat geometry, creating a low-poly version from that, and transferring attributes in Maya from the geometric high poly to the flat low. However, I was able to refine this process a lot more this time around, and it generally went much faster.

Artists disagree on the best process for creating the low-poly version: some recommend simply automatically doing it in ZBrush with ZRemesher, while others advocate for a fully manual method. I ended up doing a combination of the two. I started out ZRemeshing the flat pieces, using guides to encourage good edge flow. However, I ran into a huge issue when the polycount got reasonably low: the corners and edges were simply being lost in favor of cleaner quads (essentially, collapsing where they formed sharper points). I was able to massively improve the automation by adding thickness to my meshes in ZRemodeler, ZRemeshing the entire thing, and then deleting that thickness/back wall.

This maintained the overall pattern shapes far better, but still left some minor issues that I was later able to manually fix with Maya’s quad draw. I also ran into a few problem areas where the geometry was extremely important to the shape, such as on the pleated skirt where the edge lines need to line up with the creases; here, I simulated a much lower-poly version directly in Marvelous and then manually cleaned it up.

Final Touches

I then used the ‘transfer attributes’ feature to convert the flat low-poly to match the full high-poly version. At this point, I then made a few minor changes to the underlying geometry, welding a few of the pattern pieces that needed to be one solid piece (e.g. the shorts). I also deleted as much excess geometry as I could: some areas of the vest that had two layers were poking through the outer geometry, and there was no need to keep the undersides that would not be visible in the final product. This helped keep the polycount fairly low – I could likely have gone even lower with more manual work but I was still far under the assigned limit so I decided to leave it.

Practice 2: Forefront: Marvelous Detailing

Practice 2

Evgeniia Petrova

I’ve discovered an artist doing some of the most highly detailed, complex CLO (interchangeable with Marvelous Designer) work I’ve seen thus far: Evgeniia Petrova. As far as I can tell, they do nearly all of their process within Marvelous rather than importing basic shapes into a separate program for detailing; as someone who has previously been leaving off stitching lines, embroidery, and other details with the assumption that MD isn’t the correct place to add these in, I’m absolutely tempted to change my workflow. There is one caveat: because it doesn’t appear that they do major retopology or work outside of CLO, they don’t have to be particularly concerned with the hundreds of tiny detail geometry they’ve added as pattern pieces. If I start using some of these methods, I will likely have to drop my usual retopologize-direct-from-MD-patterns strategy and manually retopo my pieces.

They published a series on Youtube of character creation timelapses and they’ve shown off quite a few methods of using the program in ways that I wouldn’t have expected. As I mentioned, all of the stitching, embroidery, and other unique details were done with separate pieces, leading to more realistic simulation than I can ‘fake’ when sculpting in those details myself. At several instances, they increase the ‘shrinkage’ of a fabric piece to something over 100%, creating additional seam wrinkles and pulled fabric that you would see when stitching delicate fabric. They also make extensive use of copy-pasting and mirror-duplicating internal liens and tacks, making applying an effect to a larger section of fabric very trivial.

Most importantly, they opened my eyes to the ease in which quilted and embossed details can be created with duplicated, double-layer stitched pattern pieces. Their model is covered in this method: on the pants details, on the gloves, belt pouches, etc. I have a character in mind for my final major project that will be covered in quilting and decorative stitching, and I was prepared to do much of that work either manually or in the texturing stage. Knowing that I can create such complex shapes direct in Marvelous is going to massively improve the level of detail I can add to my pieces.

Application to HZD Daenerys

There weren’t too many areas on my new piece to apply all of these useful tips for quilting and complex filigree embroidery, although I’m certainly putting this knowledge in my back pocket for future projects. However, it was extremely applicable in creating more detail at the Marvelous stage itself, saving time on detail sculpting afterwards. It’s far faster for me to add seam facings, additional stitching, or garment lining in the actual garment in MD rather than painstakingly carving out seam crevices and wrinkles in ZBrush. For example, making use of the ‘shrinkage’ feature for fabric created interesting wrinkles in my Daenerys vest in a similar way that Evgeniia created details in her character’s leggings.

I had a particularly difficult time with my Laudna sculpt last semester in retopologizing a hundred edges where I had added thickness to single-sided geometry. In knowing that Marvelous creates depth at the edges of seams anyway, I attempted to add a backing layer of fabric (simply replicated, flipped normals, and stitched together at the edges, as one would a lining fabric of a garment) to every piece that would need thickness. This meant all belts and strapping, most of the leather pieces, and anywhere that the edges of the fabric would be visible (apart from the thin chiffon-like fabric of the skirt, where edge thickness isn’t necessary). In doing so, I could then throw away the backing geometry and simply keep the main single-layer piece, folded slightly down on the edges so that the underside isn’t visible. No retopo necessary!

Bibliography

Petrova, E. (2021). Clo3d. Marvelous Designer Stream. #2 Elven Outfit. Available at: https://youtu.be/5GP8t_kycOk [Accessed 2 March 2022].

Practice 2: Hair Blockout + Fabric Detailing (LB 5)

Practice 2

Small Pattern Update

In looking back at my reference images from some of Daenerys’ actual clothing from the show, I noticed a frequent use of accordion or sunray pleating. I’ve been having trouble with the drape of my character’s skirt and arm wrap, and applying this simple pleat style really helped achieve the drawn silhouette. Although this type of pleating doesn’t necessarily show up in the concept art, I figure I can take some liberties if they’re in line with the inspiration.

I also created something of a ‘lettuce hem’ effect on these two pieces by adding 150% elastic on the edges along with seam taping; this makes it appear as though there is a small rolled hem on the edge (as would be done on any chiffon or lightweight fabric piece) without actually having the geometry to create it.

Fabric Detailing

In general, I was able to incorporate a lot of good folds and details within Marvelous itself, but there were still a few things I wanted to add in ZBrush. Most of the seam lines hadn’t translated over, and I had the idea to incorporate some decorative stitching along all of the gold trim for added detail. I pulled the high-poly version over into ZBrush and started working on the details that would be later baked down.

I also did a simple blockout of the hairstyle, although it will need a lot of refinement – this may be an area that I need to drop for lack of time.

This is what my garment looked like straight out of Marvelous:

And here were some of my stitching options along with the designs I finally went with:

I also spent some time manually adding wrinkles along all of the seams and gathers just to emphasize where the fabric would pull with tension. I made good use of ZBrush’s layers feature, applying a slew of alphas and sculpting areas, and I was then able to tone down the effects for a realistic look.

Finally, I created the gold body ornamentation by sketching onto the base body, creating dividing lines with polygroupit, and running an IMM curve brush along all the specified lines. This allowed me to keep the ornamentation quite low-poly and clean, and consistent in width and depth.

Practice 2: Marvelous Refining (LB 4)

Practice 2

Vest Details

I’ve had quite a fight with the twisted fabric strips adorning Daenery’s vest. When I first saw these designs, they were immediately reminiscent of the same detailing on Aloy’s Carja Blazon outfit from the Horizon Zero Dawn game, so I sought to analyze the original model and see if I could puzzle out how it was constructed.

This helped somewhat in seeing how the pieces are laid out on the garment and their overall shape, but very little about the actual method of creating them. My best guess is fabric strips in Marvelous with thickness added later and a manual retopo that deleted all unused underlying sections and ‘stitched’ them all together. Since I intend to go with my usual retopo method straight from Marvelous, I was hoping to be able to recreate this effect purely with fabric pieces rather than a lot of custom sculpting after the fact that would obscure my nice UVs.

Unfortunately, the several methods for building strips of twisted fabric just weren’t creating the effect I was going for. The fabric was stretching and shifting rather than creating that sharp dividing line, and the alternating flaps were simply falling on top of each other with no real gaps. It quickly became clear that I would need a more complex shape for these pieces to force them exactly where they need to lay; hopefully this workaround will be hidden by the little buckles at the center of each twist in the final piece.

I ended up creating little Z-shaped ‘pillows’ of fabric, adding pressure and positive shrinkage to simulate the gathered effect of each strip. This was quite tedious, as I had to stitch each piece together by hand and keep track of a few dozen tiny patterns, but the end result was behaving exactly how I wanted.

Leg Armor & Trim

I first adjusted the fit of the pants slightly so they were closer-fitting, since I had mounted the leg armor directly onto the fabric. This kept the ‘floating’ leg armor very close to her actual leg rather than showing a gap where the invisible pants fabric was.

I then cut out shaped trim for all of the armor pieces and along the vest, stitching it down manually as well. There was yet another level of complication here, since half of the seams needed to be ‘turned’ and the other half 180 degrees, and I dealt with quite a few wiggling pieces of trim until i was able to track down any inconsistent seams. But finally, once they were all correctly assigned, I was able to repeatedly simulate the outfit while I adjusted other areas and the trim stayed in place.

Final Pattern

So here we have it, by far my most complex patterning work I’ve done in MD so far. I’m extremely proud of this piece looking at it all laid out, and I’m now tempted to try out other fiddly fabric manipulation techniques to see how far I can push the software.

Practice 2: Initial Clothing Blockout (LB 3)

Practice 2

Base Clothing

I started rapid-fire prototyping on Daenerys’s costume this week, putting down most of the major shapes and pieces. I started out on her top, attempting to work out how to create that evenly-gathered look in the draped shirt and sash. I ended up creating pleats stitched roughly together at spaced-out intervals – this is a decent approximation of the look but still a bit too uniform, and something I plan to revisit. The vest base was quite straightforward – I simulated it in a leather material to capture the stiffness of the final piece covered in strips of fabric and tacked the collar into place.

The pants were based on a simple fitted pants block, and because this pattern doesn’t have to exist in real life, I was able to get an even closer fit by adding a slight stretch to the material. I’m still slightly struggling with the skirt shape, since it’s fairly full at the top but tapers out at the bottom; I may consider adding creases or pleats to force the volume to constrict further down. For the leather leg armor, I simply stitched down a series of geometric shapes at their corners to the pant seams, and then hid the lower portion of the pants – they’ll exist for the sake of simulating but will be hidden/deleted from the final result.

The gloves, shoulder draped piece, and sash were all patterned via basic shapes and then trial-and-error. Marvelous’s fitting tools are excellent, allowing me to see where there is extra tension on a piece that could lead to stretched geometry later.

All in all, quite a successful week! I’ve been generally struggling with my speed in sculpting, so I’m very pleased at how much I was able to knock out in such a short time. It helps that I expect to do a fair amount of refining later, so I can just roughly block out these shapes without concern for their perfection.

Practice 2: Forefront: Efficient Texture Spaces

Practice 2

Analysis: Cloud Strife Revamp

One of my favorite character artists (turned educator on the subject), Laura Gallagher, recently released a series of analysis videos where she breaks down recently-released game character models and looks for optimization tricks. I found her breakdown of Cloud from the 2021 Final Fantasy 7 remake particularly enlightening, especially as someone new to the concerns of game-ready, low-polygon, limited texture space modeling. I’ve watched a huge number of tutorials on various 3D principles just trying to understand the character art pipline, but I think a lot of these secrets aren’t usually disclosed in education (and perhaps some of them are close to proprietary knowledge within companies).

So here are a few takeaways that seem nothing short of revolutionary to me!

  • The model is surprisingly high-poly at 135k tris – obviously this is a fairly high budget for anything but major hero characters, but I’ve been stressing over models with 20 or 30k and it’s good to know that the restrictions aren’t so narrow
  • The hair makes up nearly half of the polycount! The face is ~10k tris but the hair itself is a series of duplicated (front and back stuck together) hair cards and almost 50k
  • Different polycount versions of the same models are used to ‘downgrade’ characters when they are further from the camera or when detail doesn’t matter as much; e.g. the highest level of detail will be used in cutscenes but a model might be replaced in live gameplay if they’re further away from the focus as a way to reduce scene complexity
  • The polygon density decreases dramatically going from top-to-bottom on the character; there is a far higher poly budget in the face, hair, and upper body than in the legs
  • Much of the fine detail, such as pores and creases in the face, is added in separate texture sets with repeated, tiled textures that are alpha-map painted on for additional variety

Analysis: Horizon Zero Dawn – Carja Blazon Outfit

As someone fairly familiar with the armor sets in the Horizon Zero Dawn game, I was drawn to the mashup artwork that I’m sculpting for the live brief specifically for its close resemblance to one of my favorite canon designs, the Carja Blazon outfit. Thanks to Crazy31139 on Deviantart who shared several Horizon Zero Dawn character models pulled directly from the game, I was able to download and examine a model of Aloy in this costume. This turned out to be incredibly useful as a learning exercise – I feel like I’ve sussed out some very creative, modern solutions that are usually hidden under the hood.

My biggest takeaway is in the many clever ways the artists found to maintain an extremely high level of detail with a limited texture space. Apart from a few elements that are shared across costumes (head, hair, embroidered pouch symbol, arrow quiver, etc.), her entire model is contained in a single 4K texture set. This includes her painted body skin as well as all armor pieces. When examining the base color and normal maps, only the broadest details are included: overall colors, large shadows, major creases. The base color looks about as detailed as you’d expect from a simple stylized character, which makes sense given how much area was squeezed onto a single map. So how did they manage to give Aloy complex fabric designs, visible pores, and leather wrinkles? The same way the Cloud model did: with tiny tiled, repeating textures.

Digging through the source files, Aloy has a slew of small normal and height texture maps (mainly 512px, a few 1k) that are used repeatedly over the surface. Many of these, I assume, can be shared across outfit models: Aloy has multiple costumes that use similar-looking leather, rough-spun fabric, and geometric textile designs; the outfits in the game are each part of a set based on which region they’re from, and share many visual similarities (which means texture sets!). For any of Aloy’s detailed trim (along her vest, outlining all her leather armor pieces), the artists made use of trim sheets (including alphas for things like dangling beads). I imagine this means that they took the UVs for all those areas and unified them to use a single repeating section of a trim sheet.

Aloy also has quite a few elements that use the same textures overall, such as a dozen duplicated pieces of armor and a great deal of horizontal symmetry. The main texture map only has a single version of each unique armor piece, despite Aloy having many iterations of several pieces across her costume. It looks like some of the pieces were scaled or mirrored, with additional details tiled on, all to disguise the fact that there is so much repetition.

As I do so much with textile design in particular, I’ve been especially frustrated by how fabric details (individual threads, embroidery, beading) are lost, even if I devote several 4k maps to a single costume. Visible threads tend to disappear into mush or create a moire effect, and I’ve been puzzled as to how other artists have been able to maintain them; obviously, this is the answer!

Daenerys Application

Since my Daenerys model will have many of these same elements (leather armor, similar fabric pattern), and because I’m limited to one 4k texture set and 2x 2k sets, I plan to apply some of this knowledge to my live brief piece. I plan to have the 4k map devoted to her clothing, one 2k map to her head/body/hair, and one 2k map to her armor (and armored dragon, if I have time to make it). I may cheat a little and include a few tiny repeating textures as well for the extensive gold trim on her outfit and textile design. The biggest way I can save myself texture space is in re-using armor pieces: this particular design has about two dozen copies of the same spiky brown piece (making up pauldrons on both shoulders, spread out below her knee armor, on her headdress, and decorating her shoes). There are very few other unique armor pieces, but it’s not immediately noticeable because the repeated ones are scaled, squished, cut off, or mirrored. If I can make a single texture for this piece and simply duplicate it, that’s nearly all of the armor sorted! I’d also like to try and create modular armor pieces that can be replicated in the dragon, which shares a lot of visible elements.

Bibliography

Crazy31139 (2019). Horizon Zero Dawn – Aloy Carja Blazon Heavy. [image] Available at: https://www.deviantart.com/crazy31139/art/Horizon-Zero-Dawn-Aloy-Carja-Blazon-Heavy-801847148 [Accessed 16 February 2022]

Outgang. (2021). Cloud Strife Character Model Breakdown (Final Fantasy 7 Remake). [Online video]. Availablle at: https://youtu.be/w8SjXHQ8ASY [Accessed 14 February 2022]

Practice 2: Live Brief References (LB 2)

Practice 2

Additional Inspiration

Since the concept art I chose is in a fairly rough, painterly style without indicating a lot of extra detail, I sought out ideas elsewhere: from the two main inspirations to the mash-up piece.

Aloy’s in-game models have a few elements that I’d like to draw upon. There’s a geometric star pattern on most of her fabric parts that appears in several of her outfits, and would be perfect for the navy blue areas on my piece, particularly on the vest. She also has complex gold trim with stitching textures along the armor and fabric pieces, which I would like to incorporate.

Daenerys has quite a few instances where the textile artist added detail using embroidery or smocking techniques. For example, there is dragonscale smocking and arrowhead stitching on her pale blue gown, and subtle pintucks on her white gathered dress, both of which could be easily added in to my design. This may be a two-birds-with-one-stone scenario where I can add the Game of Thrones stitching to recreate Aloy’s complex gold trim.

I also plan to try and recreate one of Daenerys’s braided hairstyles, as the concept art doesn’t have too much detail in the hair. I may deviate from it somewhat and make a tighter braid as to not obscure too much of the underlying garment, but I’m still undecided.

Bibliography

Crazy31139 (2019). Horizon Zero Dawn – Aloy Carja Blazon Heavy. [image] Available at: https://www.deviantart.com/crazy31139/art/Horizon-Zero-Dawn-Aloy-Carja-Blazon-Heavy-801847148 [Accessed 16 February 2022]

FarFarAwaySite. (2016). Section of Randomness – Game of Thrones Season 6. [image] Available at: http://www.farfarawaysite.com/section/got/gallery6/gallery.htm [Accessed 16 February 2022].

Lanier, W., 2017. CDC: Mother of Machines. [image] Available at: <https://www.artstation.com/artwork/96NQQ&gt; [Accessed 17 February 2022].

Practice 2: Live Brief Ideation (LB 1)

Practice 2

Initial Ideas

I have a few goals for this project. Last semester, I was able to take a character through the full pipeline (albeit in not the most optimized way, i.e. still using XGen hair rather than hair cards and with a fairly high polycount). However, because I was learning and experimenting with each stage as I went along, this took me months, and I wasn’t able to spend very long reinforcing my learning before moving to the next piece. I’d like to become more comfortable (and much faster!) with making characters from scratch, refine my techniques, and add a solid design to my portfolio. I’d also like to tackle some new but vital skills: hair cards, cleaner retopology, and better use of texture spaces, to name a few.

My initial thought when I heard the ‘sci-fi’ prompt was to look to some of my favorite properties in that genre: Star Wars, Horizon Zero Dawn, Mass Effect…They all have one thing in common: they’re not pure sci-fi, but rather a mix of science and fantasy elements. What draws me to them isn’t the technology, but rather the world-building, the character interactions, and the magic of it all. With that, I’d like to find a character that’s appropriately sci-fi but still has that fantasy side as well. I considered trying to create sci-fi versions of, say, Lord of the Rings characters, but didn’t have a very strong vision in my head for what that would look like. I’m aware that time is extremely limited – 5 weeks isn’t much for a character – and I know I struggle designing from scratch.

A mash-up of a few characters seemed like the obvious solution to this – I remember seeing an amazing set of Dragon Age/Mass Effect character combinations that I was sorely tempted by, but ultimately decided most of them were too far into the ‘fantasy’ realm to fully fit the prompt.

HZD Daenerys

That was when I recalled a Daenerys (Game of Thrones) and Aloy (Horizon Zero Dawn) fanart by Whitney Lanier that I had admired ages ago. It was the perfect mix of two of my favorite series, would offer me a great opportunity to work on more advanced textile design and hard-surface armor, and fit well within the scope of the project. It also has some modular pieces that I can leave off if I run out of time, such as the dragon companion. And I just think it’s a beautifully aesthetic design overall!

Seeing that this was a prompt to a Facebook character art challenge (and not official or widely published fanart), I wanted to reach out to the artist for permission to sculpt it. Luckily, they were very kind and enthusiastic about this project, so it’s set!

Bibliography

AndrewRyanArt. (2012). Dragon Effect. [image] Available at: https://www.deviantart.com/andrewryanart/art/Dragon-Effect-338827419 [Accessed 15 February 2022].

Lanier, W., 2017. CDC: Mother of Machines. [image] Available at: <https://www.artstation.com/artwork/96NQQ&gt; [Accessed 17 February 2022].

Semester Final: A few mishaps

Practice 1

You look weary, traveler..

Take a pause from your reading of student blogs and enjoy some hilarity and gentle horror at the hands of my projects this semester:

And now on to your regularly scheduled blogging ๐Ÿ™‚